Windows HPC Server links

Tue, November 10, 2009, 07:27 PM under ParallelComputing | HPC
I've already described how to setup a Windows HPC Server for development. Before you dive into developing for the cluster, if you are new to this it is probably a good idea to learn the basics by reading some overview material. Below is a list of links.

Direct Links to Windows HPC content
1. Windows HPC Server 2008 Overview Datasheet (4 page pdf).

2. Windows HPC Server 2008 Technical Overview (32 page doc).

3. Windows HPC Server 2008 Getting Started Guide (26 page doc) which actually is available online as part of the TechNet technical library section on Windows HPC Server 2008, which includes much more useful data.

4. Windows HPC Server 2008 Job Scheduler (38 page doc).
5. Windows HPC Server 2008 Job Templates (56 page doc).

6. Developing for the Windows HPC Server 2008 Platform (16 page doc or pdf version).


Windows HPC sites
7. Windows HPC Forums.

8. HPC Developer Resources.

9. Windows HPC Server 2008 Resource Kit - Developer.

10. Windows HPC Server 2008 - TechNet.

11. The Windows HPC Team Blog.


HPC Course
12. High-Performance Computing Fundamentals Course (pluralisight)
13. Classic HPC Development using Visual C++ (course slides and materials in a ZIP). Author's blog post.
14. From sequential to parallel code (course slides and materials in a ZIP). Author's blog post.


Next time I will post resources specific to the most popular programming models for the cluster today: MPI and Cluster SOA - until then, happy reading!

Extension Manager in Visual Studio 2010

Tue, November 10, 2009, 10:36 AM under VisualStudio
One of the powerful aspect of Visual Studio is its ability to be extended and many people do that. You can find numerous extensions at the Visual Studio Gallery. The VSX team links to a 4-part blog series on how to create and share templates. You can also look find extension examples on the vsx code gallery.

With Visual Studio 2010, you can search for items and install them directly from within Visual Studio's new Extension Manager. You launch it from the Tools menu:


When the dialog comes up, be sure to explore the various actionable areas on the left and also note the search on the right. For example, I typed "MP" and it quickly filtered the list to show me the MPI Project Template:


Others have written about this before me, just bing Extension Manager (and note that Beta2 introduced changes, some of which you can witness in the screenshot above).

Core debugger enhancements in VS2010

Mon, November 9, 2009, 07:15 PM under VisualStudio
Since my team offers "parallel debugging", we refer to the team delivering all the other debugging features as the "core debugger" team. They have published a video of new VS2010 debugger features that I encourage you to watch to find out about enhancements with DataTips, breakpoints, dump debugging (inc. IL interpreter) and Threads window.

The raw list of features with short description is also here.

Dump debugging with Parallel Stacks

Sun, November 8, 2009, 01:57 PM under ParallelComputing
One of the areas where we fixed many bugs for Beta2 in our parallel debugging windows is with regards to managed dump debugging. So it was really cool to see Tess use the Parallel Stacks window in that scenario in her video demo with Scott.

Other than the neat ability to open managed dumps in VS2010, Parallel Stacks was the only debugging feature she needed for diagnosing the issue! Check out the video, definitely worth 10 minutes of your time.

Slides for Parallel Debugging windows

Sat, November 7, 2009, 07:50 PM under ParallelComputing
Recently I gave a talk at our Microsoft Shanghai offices on Parallel Programming so I had to update my existing Beta1 deck to Beta2 content. Specifically for Parallel Tasks and Parallel Stacks, I used 5 slides to accompany the demo.

In case you are giving talks on parallelism within Visual Studio 2010, please feel free to download and use the updated parallel debugger slides (pptx).

TIP: The slides have animations so be sure to F5 the deck for the full benefit and they also have text in the Comments section so be sure to see them at design time too.

MPI Project Template for VS2010

Fri, November 6, 2009, 08:54 PM under ParallelComputing | HPC
If you are developing MS MPI applications with Visual Studio 2010, you are probably tired of following some tedious steps for every new C++ project that you create, similar to the following:
1. In Solution Explorer, right-click YourProjectName, then click Properties to open the Property Pages dialog box.

2. Expand Configuration Properties and then under VC++ Directories place the cursor at the beginning of the list that appears in the Include Directories text box and then specify the location of the MS MPI C header files, followed by a semicolon, e.g.
C:\Program Files\Microsoft HPC Pack 2008 SDK\Include;

3. Still under Configuration Properties and under VC++ Directories place the cursor at the beginning of the list that appears in the Library Directories text box and then specify the location of the Microsoft HPC Pack 2008 SDK library file, followed by a semicolon, e.g.
if you want to build/debug 32bit application:
C:\Program Files\Microsoft HPC Pack 2008 SDK\Lib\i386;
if you want to build/debug 64bit application:
C:\Program Files\Microsoft HPC Pack 2008 SDK\Lib\amd64;

4. Under Configuration Properties and then under Linker, select Input and place the cursor at the beginning of the list that appears in the Additional Dependencies text box and then type the name of the MS MPI library, i.e.
msmpi.lib;

5. In the code file
#include "mpi.h"

6. To debug the MPI project you have just setup, under Configuration Properties select Debugging and then switch the Debugger to launch combo value from Local Windows Debugger to MPI Cluster Debugger.
Wouldn't it be great if at C++ project creation time you could choose an MPI Project Template that included the steps/configurations above? If you answered "yes", I have good news for you courtesy of a developer on our team (Qing).

Feel free to download from Visual Studio gallery the MPI Project Template.

Instructions for collecting dumps in VS2010

Thu, October 29, 2009, 07:11 PM under VisualStudio
Came across this on an internal email thread and thought it would be useful to share, in case you run into a VS crash and wish to collect the information needed by Microsoft support.

1. Start 2 instances of Visual Studio 2010 (devenv.exe).
2. In the first one select Tools -> Attach to Process.
3. Click the Select button for “Attach to:” and select Managed and Native.
4. Select the other devenv from the list and click Attach.
5. Switch to the other devenv.
6. Load your solution and try to reproduce the crash.
7. When you hit the crash the debugger should automatically break.
8. Select Debug -> Save Dump As, then set the type to minidump with heap and save the file to a location with lot’s of space.

Note: If you are running the VB profile you will not see the Save Dump As menu item. To add this menu item:
a. Select Tools -> Customize
b. Select the Commands tab
c. Select Debug from the “Menu bar” dropdown
d. Click “Add Command…”
e. Select Debug from the Categories list.
f. Find the “Save Dump As” entry in the Commands window.
g. Click OK (the “Save Dump As…” command is added to the top of the Debug menu).
h. Click “Close”

Positioning the Parallel Stacks window

Thu, October 22, 2009, 08:22 PM under ParallelComputing
When we developed the Parallel Debugging windows, we had to choose their default position in Visual Studio. For Parallel Tasks it was easy: we chose wherever the Threads window appears by default, since the two windows share characteristics in usage and appearance. Parallel Stacks may be similar to the basic concept of the Call Stack window, but it has slightly different usage patterns and very different UI. Here I'll describe our rational for the current choice for the Parallel Stacks window, offering tips and request feedback.

It was more challenging that just picking a position at random, especially due to the window having high screen real estate demands for typical applications – after all, it is a graphical view of all the call stacks of all the threads/tasks in your application. So, we quickly dismissed having it docked at the bottom or top since those are typically narrow in height windows. Some of us believed that the document editor area would be a good place for it since it has more screen real estate to offer. That approach breaks down when you realize that the Parallel Stacks window is not just presenting data, but it also allows you to quickly switch to any stack frame of any thread (with a double click). When that user action takes place, the code editor navigates to the method context and thus steals the focus from the Parallel Stacks window which gets pushed to the back (this also happens when you simply toggle the "Show External Code" option). So if you want to navigate to various places in the code via a series of examinations, that position quickly becomes irritating (just like if you docked Solution Explorer in the code editor area).

So we decided the default position to be floating! The idea is that you can resize it based on your preferences and move it in and out of the way if necessary: you get to see as much of it as you want and you keep it on top of other windows (typically to the right side). The real expectation is that you will drag the floating window to your second monitor and maximize it there.

Two other options came close to be chosen and I'll offer them here as tips in case they suit you better (in particular if you don't have a second monitor or when debugging on the go on your laptop). One is to dock it within the document editor, but in a New Vertical Tab Group. This way it takes up the space it typically needs, while keeping your code editor in view when you switch stack frames.


The other option is to dock the Parallel Stacks window where the Solution Explorer window lives. That way you can resize that group of windows horizontally to see more content (and use for navigation) without taking too much away from your code view (assuming your lines of code are not extremely long). When you are done using it, you can quickly resize it back to normal.


It is amazing how much thought/discussion goes into, what many people would consider, an insignificant detail, but that is the kind of thing I enjoy, which I guess is why I do what I do. In any case, I am eager to hear how we got this decision wrong, so please let me know.

Window Positions in Visual Studio

Tue, October 20, 2009, 05:04 PM under VisualStudio
There are many toolwindows in Visual Studio and each release keeps adding new ones. This is great for offering more features and increasing productivity, but it also adds to the number of windows we need to manage and it makes it even more important to understand how the positioning works in VS (and most of this applies to toolbars as well).

The first important thing to understand is that there are 3 different window configurations persisted per user on the machine.
1. The standard configuration: the default when you open a solution in Visual Studio.

2. The debugging configuration: the one when you hit F5 (and a little window earthquake takes place while everything readjusts).

3. The often forgotten, full screen configuration when you hit Shift+Alt+Enter, in any of the previous configurations


Once you understand the above, you should never utter the words: "didn't I just close that window, why did it come back", which we typically hear from presenters on stage after hiding, for example, Solution Explorer and then when they hit F5 it comes back. You need to hide (or otherwise position) each window for every one of the 3 configurations if you really want it to be like that all the time. Another example is if you decide to move the Breakpoints window in standard configuration, don't be surprised if it pops up somewhere else when you debug: to make sure it appears at the same place always, you need to move it to where you want in all configurations. Understanding the above also means that you won’t be looking for the Parallel Tasks window when in standard configuration since it is a debugging window and hence applicable only when in debugging mode. I hope the point is made.

The second most important thing to understand is that each window has a default position for each one of the configurations. Those default positions are different per profile that you chose the first time you run Visual Studio. Just because you have some defaults, it doesn't mean you need to stick with them, so choose what is best for you.

So what are the two basic choices we make per window?
A. Is it hidden or visible. If it is hidden, we should at least know where it lives on the menus so we can bring it up when we need it (and thus avoid the "out of sight, out of mind" pitfall). So go ahead and explore all the menus under the View menu and don't forget the ones under Architecture, Test and Analyze:
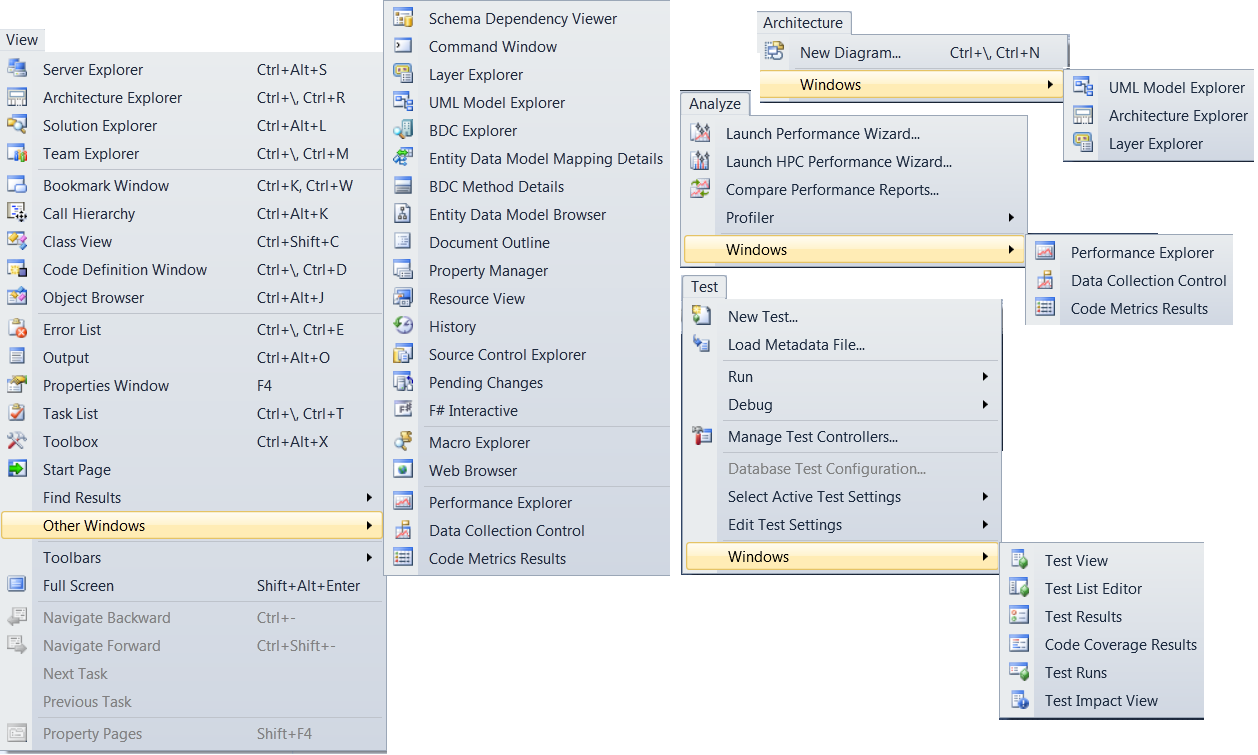
Don't forget that menu options change when you are in debugging mode, so explore the Debug menu once you've hit a breakpoint:
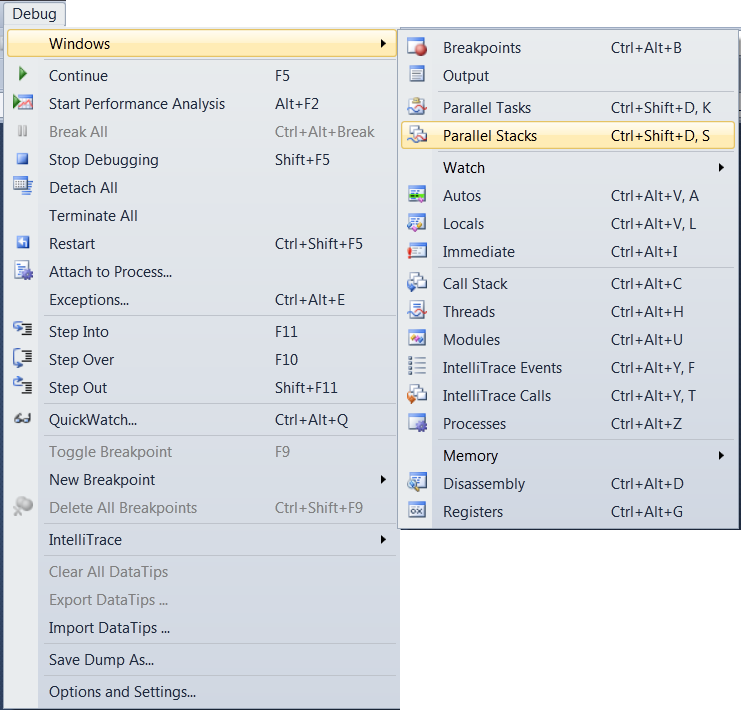
TIP: If you are not familiar with all of these windows above, maybe you are not the VS power user you thought you were ;-)

B. If you've opened a window, it has a default position that each profile team chose. You need to decide where it lives: floating (this is usually a temporary state or used on the secondary monitor, combined with MAX options), docked to the left/right/top/bottom (further decision if it is pinned or autohides controlled via the pushpin) or even docked to the center as a tabbed document (see the drop down options in the screenshot of the link).

With regards to moving a window around for docking I often observe people fighting the IDE, especially since each docking target can have multiple side-by-side groups. It is quite simple. Drag the window towards your desired area and look out for blue shaded region to appear, it represents where your window will go: if you like that position then you can release the mouse button; if you don't, keep moving the window. Along with the blue shadowed region, you also get some arrow targets appearing that you can drag the mouse pointer over (while still keeping the mouse button down so as not to release the window). Here is a screenshot of dragging the Parallel Stacks window towards the top and moving the mouse over the left arrow box that appeared.
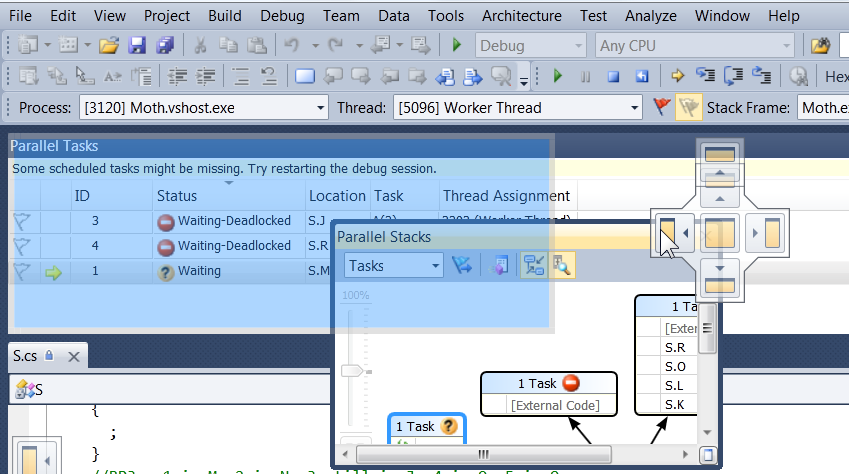
After this screenshot was taken I released the mouse button and a new window group was created next to the Parallel Tasks window that was occupied by the Parallel Stacks window. If I wanted it to join the same group as the Parallel Tasks window, I would have dragged towards the middle box and released then.

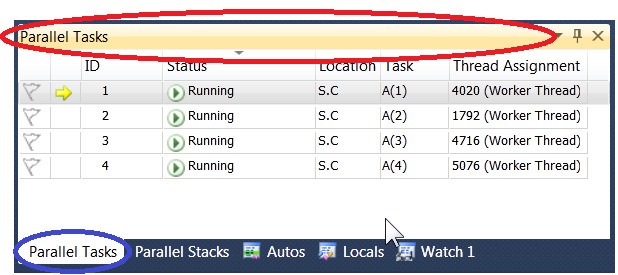
TIP: if you want to drag a window out of its group to floating, don't drag it by the title bar, but instead drag it from its tab. I.e. in the following screenshot, dragging from the title bar (red circle) will float the entire window group whereas dragging from the tab (blue circle) will float just the Parallel Tasks window.

Finally, you can backup and restore the window layouts via the Tools-> Import and Export Settings menu. FYI, they are stored on your machine in this folder: "%userprofile%\AppData\Roaming\Microsoft\VisualStudio\9.0". Look for the windows.prf and windowsidx.prf files. I found that via this msdn link.

Visual Studio 2010 Beta2 (build 21006)

Mon, October 19, 2009, 09:11 AM under VisualStudio
MSDN Subscribers can download Visual Studio 2010 Beta2 today with general public availability to follow in a couple of days. Official blog posts by Soma.

I have been using this since October 8th (2 days after it was built as you can tell from the build number) and it is amazingly better than the Beta1 in terms of performance, stability and new features too. It is worthy of its "go-live" license.


More posts to follow from me on VS2010; for now, I just updated the VS Profile screenshot and the Parallel Debugging content.