The last word on C++ AMP...

Fri, August 31, 2012, 12:47 PM under GPGPU | ParallelComputing

Well, not the last word, but the last blog post I plan to do here on that topic.

Over the last 12 months, I have published 45 blog posts related to C++ AMP on the Parallel Programming in Native Code, and the rest of the team has published even more. Occasionally I'll link to some of them from my own blog here, but today I decided to stop doing that - so if you relied on my personal blog pointing you to C++ AMP content, it is time you subscribed to the msdn blog. I will continue to blog about other topics here of course, so stay tuned.

So, for the last time, I encourage you to read the latest two blog posts I published on the team blog bringing together essential reading material on C++ AMP

Got questions on C++ AMP? Hit the msdn forum!


Get started with C++ AMP

Tue, July 24, 2012, 11:22 PM under GPGPU | ParallelComputing

With the imminent release of Visual Studio 2012, even if you do not classify yourself as a C++ developer, C++ AMP is something you should learn so you can understand how to speed up your loops by offloading to the GPU the computation performed in the loop (assuming you have large number of iterations/data). We have many C# customers who are using C++ AMP through pinvoke, and of course many more directly from C++.

So regardless of your programming language, I hope you'll find helpful these short videos that help you get started with C++ AMP

  1. C++ AMP core API introduction... from scratch
  2. Tiling Introduction - C++ AMP
  3. Matrix Multiplication with C++ AMP
  4. GPU debugging in Visual Studio 2012

In particular the work we have done for parallel and GPU debugging in Visual Studio 2012 is market leading, so check it out!


Attend my Fusion sessions

Wed, June 6, 2012, 07:50 PM under Events | GPGPU | ParallelComputing

The inaugural Fusion conference was 1 year ago in June 2011 and I was there doing a demo in the keynote, and also presenting a breakout session. If you look at the abstract and title for that session you won't see the term "C++ AMP" in there because the technology wasn't announced and we didn't want to spill the beans ahead of the keynote, where the technology was announced. It was only an announcement, we did not give any bits out, and in fact the first bits came three months later in September 2011 with the Beta following in February 2012.

So it really feels great 1 year later, to be back at Fusion presenting two sessions on C++ AMP, demonstrating our progress from that announcement, to the Visual Studio 2012 Release Candidate that came out last week.

If you are attending Fusion (in person or virtually later), be sure to watch my two-part session. Part 1 is PT-3601 on Tuesday 4pm and part 2 is PT-3602 on Wednesday 4pm. Here is the shared abstract for both parts:

Harnessing GPU Compute with C++ AMP

C++ AMP is an open specification for taking advantage of accelerators like the GPU. In this session we will explore the C++ AMP implementation in Microsoft Visual Studio 2012. After a quick overview of the technology understanding its goals and its differentiation compared with other approaches, we will dive into the programming model and its modern C++ API. This is a code heavy, interactive, two-part session, where every part of the library will be explained. Demos will include showing off the richest parallel and GPU debugging story on the market, in the upcoming Visual Studio release.

See you there!


Attend my GTC sessions

Sun, May 13, 2012, 01:36 PM under Events | GPGPU | ParallelComputing

The last GTC conference in the US was 2 years ago and I was there as an attendee. You may recall from that blog post that we were running UX studies at the time.

It really feels great 2 years later, to be back at GTC presenting two sessions on C++ AMP, demonstrating our progress that includes input from those early studies.

If you are attending GTC (in person or virtually later), be sure to watch my two-part session. Part 1 is S0242 on Wednesday 5pm and part 2 is S0244 on Thursday 10am. Here is the shared abstract for both parts:

Harnessing GPU Compute with C++ AMP

C++ AMP is an open specification for taking advantage of accelerators like the GPU. In this session we will explore the C++ AMP implementation in Microsoft Visual Studio 11 Beta. After a quick overview of the technology understanding its goals and its differentiation compared with other approaches, we will dive into the programming model and its modern C++ API. This is a code heavy, interactive, two-part session, where every part of the library will be explained. Demos will include showing off the richest parallel and GPU debugging story on the market, in the upcoming Visual Studio release.

See you there!


Screencasts introducing C++ AMP

Thu, April 12, 2012, 07:07 PM under GPGPU | ParallelComputing

It has been almost 2.5 years since I last recorded a screencast, and I had forgotten how time consuming they are to plan/record/edit/produce/publish, but at the same time so much fun to see the end result!

So below are links to 4 screencasts to teach you C++ AMP basics from scratch (even if you class yourself as a .NET developer you'll be able to follow).

  1. Setup code - part 1
  2. array_view, extent, index - part 2
  3. parallel_for_each - part 3
  4. accelerator - part 4

If you have comments/questions about what is shown in each video, please leave them at each video recoding. If you have generic questions about C++ AMP, please ask in the C++ AMP MSDN forum.


My MSDN magazine articles are live

Mon, April 2, 2012, 07:01 AM under GPGPU | ParallelComputing

Five years ago I wrote my first MSDN magazine article, and 21 months later I wrote my second MSDN Magazine article (during the VS 2010 Beta). By my calculation, that makes it two and a half years without having written anything for my favorite developer magazine!

So, I came back with a vengeance, and in this month's April issue of the MSDN magazine you can find two articles from yours truly - enjoy:

  1. A Code-Based Introduction to C++ AMP
  2. Introduction to Tiling in C++ AMP

For more on C++ AMP, please remember that I blog about it on our team blog, and we take questions in our MSDN forum.


C++ AMP Video Overview

Fri, February 24, 2012, 03:44 PM under GPGPU | ParallelComputing

I hope to be recording some C++ AMP screencasts for channel9 soon (you'll find them through my regular screencasts link on the left), and in all of them I will assume you have watched this short interview overview of C++ AMP.

image 

Note: I think there were some technical problems with streaming so best to download the "High Quality WMV" or switch to progressive format.


C++ AMP open specification

Fri, February 3, 2012, 03:11 PM under ParallelComputing

Those of you interested in C++ AMP should know that I blog about that topic on our team blog.

Just now I posted (and encourage you to go read) our much awaited announcement about the publication of the C++ AMP open specification.

For those of you into compiling instead of reading, 3 days ago I posted a list of over a dozen C++ AMP samples.

To follow what I and others on my team write about C++ AMP, stay tuned on our RSS feed.


.NET access to the GPU for compute purposes

Thu, December 1, 2011, 07:42 PM under GPGPU | ParallelComputing

In the distant past I talked about GPGPU and Microsoft's then approach of DirectCompute. Since then of course we now have C++ AMP coming out with Visual Studio 11, so there is a mainstream easier way for developers to access the GPU for compute purposes, using C++.

The question occasionally arises of how can a .NET developer access the GPU for compute purposes from their C# (or VB) code. The answer is by interoping from the managed code to a native DLL and in the native DLL use C++ AMP.

As a long term .NET developer myself, I can tell you this is straightforward. Sure, there could have been a managed wrapper for C++ AMP, but honestly that is the reason we have interop – it doesn't make much sense to invest resources to solve a problem that is already solved (most developer customers would prefer investments in other areas of Visual Studio!). Besides, interoping from C# to C++ is much easier than interoping to some of the other older approaches of GPGPU programming ;-)

To help you get started with the interop approach, Igor Ostrovsky has previously shared the "Hello World" version of interoping from C# to C++ AMP in his blog post:

…we then were asked specifically about how to interop from C# to C++ AMP in a Metro style application on Windows 8, so Igor delivered again with this post:

Have fun!


Short interview on C++ AMP

Mon, October 17, 2011, 05:04 PM under GPGPU | ParallelComputing

While at the BUILD conference a month ago, I run into Bruno Boucard who asked me a few questions about C++ AMP. I just returned from vacation to find that he uploaded the 15-minute interview, so here is a direct link to youtube

play

http://www.youtube.com/watch?v=a2IbOe_ogGE

What DX level does my graphics card support? Does it go to 11?

Fri, October 14, 2011, 05:13 PM under GPGPU | ParallelComputing

Recently I run into a situation that I have run into quite a few times. Someone encounters a machine and the question arises: "Is there a DirectX 11 card in this machine?". Typically the reason you are interested in that is because cards with DirectX 11 drivers fully support DirectCompute (and by extension C++ AMP) for GPGPU programming. The driver specifically is WDDM (1.1 on Windows 7 and Windows 8 introduces WDDM 1.2 with cool new capabilities).

There are many ways for figuring out if you have a DirectX11 card, so here are the approaches that you can use, with a bonus right at the end of the post.

Run DxDiag

WindowsKey + R, type DxDiag and hit Enter. That is the DirectX diagnostic tool, which unfortunately, only tells you on the "System" tab what is the highest version of DirectX installed on your machine. So if it reports DirectX 11, that doesn't mean you have a DX11 driver! The "Display" tab has a promising "DDI version" label, but unfortunately that doesn't seem to be accurate on the machines I've tested it with (or I may be misinterpreting its use). Either way, this tool is not the one you want for this purpose, although it is good for telling you the WDDM version among other things.

Use the Microsoft hardware page

There is a Microsoft Windows 7 compatibility center, that lists all hardware (tip: use the advanced search) and you could try and locate your device there… good luck.

Use Wikipedia or the hardware vendor's website

Use the Wikipedia page for the vendor cards, for both nvidia and amd. Often this information will also be in the specifications for the cards on the IHV site, but is is nice that wikipedia has a single page per vendor that you can search etc. There is a column in the tables for API support where you can see the DirectX version.

Check if it is one of these recommended DX11 cards

You may not have a DirectX 11 card and are interested in purchasing one. While I am in no position to make recommendations, I will list here some cards from two big IHVs that we know are DirectX 11 capable.

  • Some AMD (aka ATI) cards
    • Low end, inexpensive DX11 hardware:
      • Radeon 5450, 5550, 6450, 6570
    • Mid range (decent perf, single precision):
      • Radeon 5750, 5770, 6770, 6790
    • High end (capable of double precision):
      • Radeon 5850, 5870, 6950, 6970
    • Single precision APUs:
      • AMD E-Series APUs
      • AMD A-Series APUs
  • Some NVIDIA cards
    • Low end, inexpensive DX11 hardware:
      • GeForce GT430, GT 440, GT520, GTS 450
      • Quadro 400, 600
    • Mid-range (decent perf, single precision):
      • GeForce GTX 460, GTX 550 Ti, GTX 560, GTX 560 Ti
      • Quadro 2000
    • High end (capable of double precision):
      • GeForce GTX 480, GTX 570, GTX 580, GTX 590, GTX 595
      • Quadro 4000, 5000, 6000
      • Tesla C2050, C2070, C2075

Get the DirectX SDK and run DirectX Caps Viewer

Download and install the June 2010 DirectX SDK. As part of that you now have the DirectX Capabilities Viewer utility (find it in your start menu by searching for "DirectX Caps Viewer", the filename is DXCapsViewer.exe). It will list all your devices (emulated, and real hardware ones) under the first node. Expand the hardware entries and then expand again the Direct3D 11 folder. If you see D3D_FEATURE_LEVEL_11_ under that, then your card supports feature level 11 which means it supports DirectCompute and C++ AMP. In the following screenshot of one of my old laptops, the card only goes to feature level 10.

DirectX Caps Viewer

Run a utility from the web that just tells you!

Of course, writing some C++ AMP code that enumerates accelerators and lists the ones that are capable is trivial. However that requires that you have redistributed the runtime, so a more broadly applicable approach is to use the DX APIs directly to enumerate the DX11 capable cards. That is exactly what the development lead for C++ AMP has done and he describes and shares that utility at this post.


Give a session on C++ AMP – here is how

Wed, September 21, 2011, 06:53 PM under GPGPU | ParallelComputing

2/29/2012 added some Beta notes inline

Ever since presenting on C++ AMP at the AMD Fusion conference in June, then the Gamefest conference in August, and the BUILD conference in September, I've had numerous requests about my material from folks that want to re-deliver the same session. The C++ AMP session I put together has evolved over the 3 presentations to its final form that I used at BUILD, so that is the one I recommend you base yours on.BUILD session

Please get the slides and the recording from channel9 (I'll refer to slide numbers below).

This is how I've been presenting the C++ AMP session:

Context

  1. (slide 3, 04:18-08:18) Start with a demo, on my dual-GPU machine. I've been using the N-Body sample.
  2. (slide 4) Use an nvidia slide that has additional examples of performance improvements that customers enjoy with heterogeneous computing.
  3. (slide 5) Talk a bit about the differences today between CPU and GPU hardware, leading to the fact that these will continue to co-exist and that GPUs are great for data parallel algorithms, but not much else today. One is a jack of all trades and the other is a number cruncher.
  4. (slide 6) Use the APU example from amd, as one indication that the hardware space is still in motion, emphasizing that the C++ AMP solution is a data parallel API, not a GPU API. It has a future proof design for hardware we have yet to see.
  5. (slide 7) Provide more meta-data, as blogged about when I first introduced C++ AMP.

Code

  1. (slide 9-11) Introduce C++ AMP coding with a simplistic array-addition algorithm – the slides speak for themselves.
  2. (slide 12-13) index, and extent (Beta note: the old slide also refers to a grid class, which we removed in favor of just extent)
  3. (Slide 14-16) array, array_view and comparison between them.
  4. (Slide 17) parallel_for_each.
  5. (slide 18, 21) restrict.
  6. (slide 19-20) actual restrictions of restrict(amp) – the slides speak for themselves. (Beta note: the slide refers  to restrict(direct3d), which is now restrict(amp))
  7. (slide 22) bring it altogether with a matrix multiplication example.
  8. (slide 23-24) accelerator, and accelerator_view.
  9. (slide 26-29) Introduce tiling incl. tiled matrix multiplication [tiling probably deserves a whole session instead of 6 minutes!].

IDE

  1. (slide 34,37) Briefly touch on the concurrency visualizer. It supports GPU profiling, but enhancements specific to C++ AMP come at the Beta timeframe.
  2. (slide 35-36, 51:54-59:16) Demonstrate the GPU debugging experience in VS 11.

Summary

  1. (slide 39) Re-iterate some of the points of slide 7, and add the point that C++ AMP is an open specification.
  2. (slide 40) Links to content – see slide – including where all your questions should go: http://social.msdn.microsoft.com/Forums/en/parallelcppnative/threads.

Slides for similar presentation updated for Beta

The BUILD recording and slides are valid for the VS 11 Beta and beyond, with regards to C++ AMP - so watch the session and download those slides. Additionally, if you are going to repeat the session, I have updated the slides including some tweaks and you can download the updated deck here (note the slide numbers above do not map exactly to the new deck).

"But I don't have time for a full blown session, I only need 2 (or just 1, or 3) C++ AMP slides to use in my session on related topic X"

If all you want is a small number of slides, you can take some from the session above and customize them. But because I am so nice, I have created some slides for you, including talking points in the notes section. Download them here.


GPU Debugging with VS 11

Tue, September 20, 2011, 07:21 PM under GPGPU | ParallelComputing | VisualStudio

BELOW IS OUTDATED INFORMATION, PLEASE SEE MY UPDATED POST ON OUR TEAM BLOG:

http://blogs.msdn.com/b/nativeconcurrency/archive/2012/03/17/start-gpu-debugging-in-visual-studio-11.aspx

---

With VS 11 Developer Preview we have invested tremendously in parallel debugging for both CPU (managed and native) and GPU debugging. I'll be doing a whole bunch of blog posts on those topics, and in this post I just wanted to get people started with GPU debugging, i.e. with debugging C++ AMP code.

First I invite you to watch 6 minutes of a glimpse of the C++ AMP debugging experience though this video (ffw to minute 51:54, up until minute 59:16). Don't read the rest of this post, just go watch that video, ideally download the High Quality WMV.

Summary

GPU debugging essentially means debugging the lambda that you pass to the parallel_for_each call (plus any functions you call from the lambda, of course). CPU debugging means debugging all the code above and below the parallel_for_each call, i.e. all the code except the restrict(direct3d) lambda and the functions that it calls. With VS 11 you have to choose what debugger you want to use for a particular debugging session, CPU or GPU. So you can place breakpoints all over your code, then choose what debugger you want (CPU or GPU), and you'll only be able to hit breakpoints for the code type that the debugger engine understands – the remaining breakpoints will appear as unbound. If you want to hit the unbound breakpoints, you'd have to stop debugging, and start again with the other debugger. Sorry. We suck. We know. But once you are past that limitation, I think you'll find the experience truly rewarding – seriously!

Switching debugger engines

With the Developer Preview bits, one way to switch the debugger engine is through the project properties – see the screenshots that follow.

This one is showing the CPU option selected, which is basically the default that you are all familiar with:

image

This screenshot is showing the GPU option selected, by changing the debugger launcher (notice that this applies for both the local and remote case):

image

You actually do not have to open the project properties just for switching the debugger engine, you can switch the selection from the toolbar in VS 11 Developer Preview too – see following screenshot (the effect is the same as if you opened the project properties and switched there)

image

Breakpoint behavior

Here are two screenshots, one showing a debugging session for CPU and the other a debugging session for GPU (notice the unbound breakpoints in each case)

image

…and here is the GPU case (where we cannot bind the CPU breakpoints but can the GPU breakpoint, which is actually hit)

image

Give C++ AMP debugging a try

So to debug your C++ AMP code, pull down the drop down under the 'play' button to select the 'GPU C++ Direct3D Compute Debugger' menu option, then hit F5 (or the 'play' button itself). Then you can explore debugging by exploring the menus under the Debug and under the Debug->Windows menus. One way to do that exploration is through the C++ AMP debugging walkthrough on MSDN.

Another way to explore the C++ AMP debugging experience, you can use the moth.cpp code file, which is what I used in my BUILD session debugger demo. Note that for my demo I was using the latest internal VS11 bits, so your experience with the Developer Preview bits won't be identical to what you saw me demonstrate, but it shouldn't be far off.

Stay tuned for a lot more content on the parallel debugger in VS 11, both CPU and GPU, both managed and native.


Running C++ AMP kernels on the CPU

Mon, September 19, 2011, 07:32 PM under GPGPU | ParallelComputing

One of the FAQs we receive is whether C++ AMP can be used to target the CPU.

For targeting multi-core we have a technology we released with VS2010 called PPL, which has had enhancements for VS 11 – that is what you should be using! FYI, it also has a Linux implementation via Intel's TBB which conforms to the same interface.

When you choose to use C++ AMP, you choose to take advantage of massively parallel hardware, through accelerators like the GPU.

Having said that, you can always use the accelerator class to check if you are running on a system where the is no hardware with a DirectX 11 driver, and decide what alternative code path you wish to follow. 

In fact, if you do nothing in code, if the runtime does not find DX11 hardware to run your code on, it will choose the WARP accelerator which will run your code on the CPU, taking advantage of multi-core and SSE2 (depending on the CPU capabilities WARP also uses SSE3 and SSE 4.1 – it does not currently use AVX and on such systems you hopefully have a DX 11 GPU anyway).

A few things to know about WARP

  • It is our fallback CPU solution, not intended as a primary target of C++ AMP.
  • WARP stands for Windows Advanced Rasterization Platform and you can read old info on this MSDN page on WARP.
  • What is new in Windows 8 Developer Preview is that WARP now supports DirectCompute, which is what C++ AMP builds on.
  • It is not currently clear if we will have a CPU fallback solution for non-Windows 8 platforms when we ship.
  • When you create a WARP accelerator, its is_emulated property returns true.
  • WARP does not currently support double precision.


BTW, when we refer to WARP, we refer to this accelerator described above. If we use lower case "warp", that refers to a bunch of threads that run concurrently in lock step and share the same instruction. In the VS 11 Developer Preview, the size of warp in our Ref emulator is 4 – Ref is another emulator that runs on the CPU, but it is extremely slow not intended for production, just for debugging.


Links to C++ AMP and other content

Fri, September 16, 2011, 10:00 PM under GPGPU | Links | ParallelComputing | VisualStudio | Windows

A few links you may be interested in.


BUILD apps that use C++ AMP

Tue, September 13, 2011, 08:28 PM under Events | GPGPU | ParallelComputing

If you are a developer on the Microsoft platform, you are hopefully attending (live or virtually) the sessions of the BUILD conference, aka //build/ in Anaheim, CA. The conference sold out not long after it opened registration, and it achieved that without sharing *any* session details nor a meaningful agenda up until after the keynote today – impressive!

I am speaking at BUILD and hope you'll catch my talk at 9am on Friday (the last day of the conference) at Marriott Elite 2 Ballroom. Session details follow.

802 - Taming GPU compute with C++ AMP

Developers today inject parallelism into their compute-intensive applications in order to take advantage of multi-core CPU hardware. Beyond CPUs, however, compute accelerators such as general-purpose GPUs can provide orders of magnitude speed-ups for data parallel algorithms. How can you as a C++ developer fully utilize this heterogeneous hardware from your Visual Studio environment?  How can you benefit from this tremendous performance boost in your Visual C++ solutions without sacrificing developer productivity?  The answers will be presented in this session about C++ Accelerated Massive Parallelism.

I'll be covering a lot of the material I've been recently blogging about on my blog that you are reading, which I have also indexed over on our team blog under the title: "C++ AMP in a nutshell".


tile_static, tile_barrier, and tiled matrix multiplication with C++ AMP

Sun, September 11, 2011, 06:23 PM under GPGPU | ParallelComputing

We ended the previous post with a mechanical transformation of the C++ AMP matrix multiplication example to the tiled model and in the process introduced tiled_index and tiled_extent. This is part 2.

tile_static memory

You all know that in regular CPU code, static variables have the same value regardless of which thread accesses the static variable. This is in contrast with non-static local variables, where each thread has its own copy.

Back to C++ AMP, the same rules apply and each thread has its own value for local variables in your lambda, whereas all threads see the same global memory, which is the data they have access to via the array and array_view.

In addition, on an accelerator like the GPU, there is a programmable cache, a third kind of memory type if you'd like to think of it that way (some call it shared memory, others call it scratchpad memory). Variables stored in that memory share the same value for every thread in the same tile. So, when you use the tiled model, you can have variables where each thread in the same tile sees the same value for that variable, that threads from other tiles do not. The new storage class for local variables introduced for this purpose is called tile_static. You can only use tile_static in restrict(amp) functions, and only when explicitly using the tiled model. What this looks like in code should be no surprise, but here is a snippet to confirm your mental image, using a good old regular C array

  // each tile of threads has its own copy of locA,
  // shared among the threads of the tile
  tile_static float locA[16][16]; 

Note that tile_static variables are scoped and have the lifetime of the tile, and they cannot have constructors or destructors.

tile_barrier

In amp.h one of the types introduced is tile_barrier. imageYou cannot construct this object yourself (although if you had one, you could use a copy constructor to create another one). So how do you get one of these? You get it, from a tiled_index object. Beyond the 4 properties returning index objects, tiled_index has another property, barrier, that returns a tile_barrier object. The tile_barrier class exposes the method wait (and other wait overloads).

15:  // Given a tiled_index object named t_idx
16:  t_idx.barrier.wait();

17:  // more code

…in the code above, all threads in the tile will reach line 16 before a single one progresses to line 17. Note that all threads must be able to reach the barrier, i.e. if you had branchy code in such a way which meant that there is a chance that not all threads could reach line 16, then the code above would be illegal.

Tiled Matrix Multiplication Example – part 2

So now that we added to our understanding the concepts of tile_static and tile_barrier, let me obfuscate rewrite the matrix multiplication code so that it takes advantage of tile_static memory. Before you start reading this, I suggest you get a cup of your favorite non-alcoholic beverage to enjoy while you try to fully understand the code.

01: void MatrixMultiplyTiled(vector<float>& vC, 
         const vector<float>& vA, 
         const vector<float>& vB, int M, int N, int W)
02: {
03:   static const int TS = 16;

04:   array_view<const float,2> a(M, W, vA);
05:   array_view<const float,2> b(W, N, vB);
06:   array_view<float,2> c(M,N,vC); c.discard_data();

07:   parallel_for_each(c.extent.tile< TS, TS >(),
08:   [=] (tiled_index< TS, TS> t_idx) restrict(amp) 
09:   {
10:     int row = t_idx.local[0]; int col = t_idx.local[1];
11:     float sum = 0.0f;

12:     for (int i = 0; i < W; i += TS) {
13:        tile_static float locA[TS][TS], locB[TS][TS];
14:        locA[row][col] = a(t_idx.global[0], col + i);
15:        locB[row][col] = b(row + i, t_idx.global[1]);
16:        t_idx.barrier.wait();

17:        for (int k = 0; k < TS; k++)
18:          sum += locA[row][k] * locB[k][col];

19:        t_idx.barrier.wait();
20:     }

21:     c[t_idx.global] = sum;
22:   });
23: }

Notice that all the code up to line 9 is the same as per the changes we made in part 1 of tiling introduction. If you squint, the body of the lambda itself preserves the original algorithm on lines 10, 11, and 17, 18, and 21. The difference being that those lines use new indexing and the tile_static arrays; the tile_static arrays are declared and initialized on the brand new lines 13-15. On those lines we copy from the global memory represented by the array_view objects (a and b), to the tile_static vanilla arrays (locA and locB)we are copying enough to fit a tile. Because in the code that follows on line 18 we expect the data for this tile to be in the tile_static storage, we need to synchronize the threads within each tile with a barrier, which we do on line 16 (to avoid accessing uninitialized memory on line 18). We also need to synchronize the threads within a tile on line 19, again to avoid the race between lines 14, 15 (retrieving the next set of data for each tile and overwriting the previous set) and line 18 (not being done processing the previous set of data). Luckily, as part of the awesome C++ AMP debugger in Visual Studio there is an option that helps you find such races, but that is a story for another blog post another time.

May I suggest reading the next section, and then coming back to re-read and walk through this code with pen and paper to really grok what is going on, if you haven't already? Cool.

Why would I introduce this tiling complexity into my code?

Funny you should ask that, I was just about to tell you. There is only one reason we tiled our extent, had to deal with finding a good tile size, ensure the number of threads we schedule are correctly divisible with the tile size, had to use a tiled_index instead of a normal index, and had to understand tile_barrier and to figure out where we need to use it, and double the size of our lambda in terms of lines of code: the reason is to be able to use tile_static memory.

Why do we want to use tile_static memory? Because accessing tile_static memory is around 10 times faster than accessing the global memory on an accelerator like the GPU, e.g. in the code above, if you can get 150GB/second accessing data from the array_view a, you can get 1500GB/second accessing the tile_static array locA. And since by definition you are dealing with really large data sets, the savings really pay off. We have seen tiled implementations being twice as fast as their non-tiled counterparts.

Now, some algorithms will not have performance benefits from tiling (and in fact may deteriorate), e.g. algorithms that require you to go only once to global memory may not benefit from tiling, since with tiling you already have to fetch the data once from global memory! Other algorithms may benefit, but you may decide that you are happy with your code being 50 times faster than the serial-version you had, and you do not need to invest to make it 100 times faster. Also algorithms with more than 3 dimensions, which C++ AMP supports in the simple model, cannot be tiled.

Also note that in future releases, we may invest in making the non-tiled model, which already uses tiling under the covers, go the extra step and use tile_static memory on your behalf, but it is obviously way to early to commit to anything like that, and we certainly don't do any of that today.


Scheduling thread tiles with C++ AMP

Sat, September 10, 2011, 08:30 PM under GPGPU | ParallelComputing

This post assumes you are totally comfortable with, what some of us call, the simple model of C++ AMP, i.e. you could write your own matrix multiplication. We are now ready to explore the tiled model, which builds on top of the non-tiled one.

Tiling the extent

We know that when we pass an extent to the parallel_for_each call, it determines the number of threads to schedule and their index values (including dimensionality). For the single-, two-, and three- dimensional cases you can go a step further and subdivide the threads into what we call tiles of threads (others may call them thread groups).

So here is a single-dimensional example:

  extent<1> e(20);   // 20 units in a single dimension with indices from 0-19
  tiled_extent<4> te = e.tile<4>();

…on the 2nd line we subdivided the single-dimensional space into 5 single-dimensional tiles each having 4 elements, and we captured that result in a concurrency::tiled_extent (a new class in amp.h).

Let's move on swiftly to another example, in pictures, this time 2-dimensional:

image

So we start on the left with a 2-dimensional extent which has 8*6=48 threads. We then have two different examples of tiling. In the first case, in the middle, we subdivide the 48 threads into tiles where each has 4*3=12 threads, hence we have 2*2=4 tiles. In the second example, on the right, we subdivide the original input into tiles where each has 2*2=4 threads, hence we have 4*3=12 tiles. Notice how you can play with the tile size and achieve different number of tiles. The numbers you pick must be such that the original total number of threads (in our example 48), remains the same, and every tile must have the same size.

Of course, you still have no clue why you would do that, but stick with me. First, we should see how we can use this tiled_extent, since the parallel_for_each function that we know expects a extent.

Tiled parallel_for_each and tiled_index

It turns out that we have additional overloads of parallel_for_each that accept a tiled_extent instead of a extent. However, those overloads, also expect that the lambda you pass in accepts a concurrency::tiled_index (new in amp.h), not an index<N>. So how is a tiled_index different to an index?

A tiled_index object, can have only 1 or 2 or 3 dimensions (matching exactly the tiled_extent), and consists of 4 index objects that are accessible via properties: global, local, tile_origin, and tile. The global index is the same as the index we know and love: the global thread ID. The local index is the local thread ID within the tile. The tile_origin index returns the global index of the thread that is at position 0,0 of this tile, and the tile index is the position of the tile in relation to the overall grid. Confused? Here is an example accompanied by a picture that hopefully clarifies things:image

  array_view<int, 2> data(8, 6, p_my_data);
  parallel_for_each(data.extent.tile<2,2>(), [=](tiled_index<2,2> t_idx) restrict(amp) { ... });

Given the code above and the picture on the right, what are the values of each of the 4 index objects that the t_idx variables exposes, when the lambda is executed by T (highlighted in the picture on the right)?

If you can't work it out yourselves, the solution follows:

  • t_idx.global       = index<2> (6,3)
  • t_idx.local          = index<2> (0,1)
  • t_idx.tile_origin = index<2> (6,2)
  • t_idx.tile             = index<2> (3,1)

Don't move on until you are comfortable with this… the picture really helps, so use it.

Tiled Matrix Multiplication Example – part 1

Let's paste here the C++ AMP matrix multiplication example, bolding the lines we are going to change (can you guess what the changes will be?)

01:  void MatrixMultiplyTiled_Part1(vector<float>& vC, 
         const vector<float>& vA, 
         const vector<float>& vB, int M, int N, int W)
02:  {
03:
04:    array_view<const float,2> a(M, W, vA);
05:    array_view<const float,2> b(W, N, vB);
06:    array_view<float,2> c(M, N, vC); c.discard_data();

07:    parallel_for_each(c.extent, 
08:    [=](index<2> idx) restrict(amp) {
09:
10:      int row = idx[0]; int col = idx[1];
11:      float sum = 0.0f;
12:      for(int i = 0; i < W; i++)
13:        sum += a(row, i) * b(i, col);
14:      c[idx] = sum;
15:    });
16:  }

To turn this into a tiled example, first we need to decide our tile size. Let's say we want each tile to be 16*16 (which assumes that we'll have at least 256 threads to process, and that c.extent.size() is divisible by 256, and moreover that c.extent[0] and c.extent[1] are divisible by 16). So we insert at line 03 the tile size (which must be a compile time constant).

03: static const int TS = 16;

...then we need to tile the extent to have tiles where each one has 16*16 threads, so we change line 07 to be as follows

07: parallel_for_each(c.extent.tile<TS,TS>(),

...that means that our index now has to be a tiled_index with the same characteristics as the tiled_extent, so we change line 08

08: [=](tiled_index<TS, TS> t_idx) restrict(amp) {

...which means, without changing our core algorithm, we need to be using the global index that the tiled_index gives us access to, so we insert line 09 as follows

09: index<2> idx = t_idx.global;

...and now this code just works and it is tiled!

Closing thoughts on part 1

The process we followed just shows the mechanical transformation that can take place from the simple model to the tiled model (think of this as step 1). In fact, when we wrote the matrix multiplication example originally, the compiler was doing this mechanical transformation under the covers for us (and it has additional smarts to deal with the cases where the total number of threads scheduled is not divisible by the tile size). The point is that the thread scheduling is always tiled, even when you use the non-explicitly-tiled model.

But with this mechanical transformation, we haven't gained anything… Hint: our goal with explicitly using the tiled model is to gain even more performance.

In the next post, we'll evolve this further (beyond what the compiler can automatically do for us, in this first release), so you can see the full usage of the tiled model and its benefits…


Matrix Multiplication with C++ AMP

Fri, September 9, 2011, 08:22 PM under GPGPU | ParallelComputing

As part of our API tour of C++ AMP, we looked recently at parallel_for_each. I ended that post by saying we would revisit parallel_for_each after introducing array and array_view. Now is the time, so this is part 2 of parallel_for_each, and also a post that brings together everything we've seen until now.

The code for serial and accelerated

Consider a naïve (or brute force) serial implementation of matrix multiplication 

0:  void MatrixMultiplySerial(std::vector<float>& vC, 
        const std::vector<float>& vA, 
        const std::vector<float>& vB, int M, int N, int W)
1:  {
2:    for (int row = 0; row < M; row++) 
3:    {
4:      for (int col = 0; col < N; col++)
5:      {
6:        float sum = 0.0f;
7:        for(int i = 0; i < W; i++)
8:          sum += vA[row * W + i] * vB[i * N + col];
9:        vC[row * N + col] = sum;
10:     }
11:   }
12: }

We notice that each loop iteration is independent from each other and so can be parallelized. If in addition we have really large amounts of data, then this is a good candidate to offload to an accelerator. First, I'll just show you an example of what that code may look like with C++ AMP, and then we'll analyze it. It is assumed that you included at the top of your file #include <amp.h>

13:  void MatrixMultiplySimple(std::vector<float>& vC, 
         const std::vector<float>& vA, 
         const std::vector<float>& vB, int M, int N, int W)
14:  {
15:    concurrency::array_view<const float,2> a(M, W, vA);
16:    concurrency::array_view<const float,2> b(W, N, vB);
17:    concurrency::array_view<float,2> c(M, N, vC); c.discard_data();
18:    concurrency::parallel_for_each(c.extent, 
19:    [=](concurrency::index<2> idx) restrict(amp) {
20:      int row = idx[0]; int col = idx[1];
21:      float sum = 0.0f;
22:      for(int i = 0; i < W; i++)
23:        sum += a(row, i) * b(i, col);
24:      c[idx] = sum;
25:    });
26:  }

First a visual comparison, just for fun: The beginning and end is the same, i.e. lines 0,1,12 are identical to lines 13,14,26. The double nested loop (lines 2,3,4,5 and 10,11) has beenMatrix Multiplication image from wikipedia transformed into a parallel_for_each call (18,19,20 and 25). The core algorithm (lines 6,7,8,9) is essentially the same (lines 21,22,23,24). We have extra lines in the C++ AMP version (15,16,17). Now let's dig in deeper.

Using array_view and extent

When we decided to convert this function to run on an accelerator, we knew we couldn't use the std::vector objects in the restrict(amp) function. So we had a choice of copying the data to the the concurrency::array<T,N> object, or wrapping the vector container (and hence its data) with a concurrency::array_view<T,N> object from amp.h – here we used the latter (lines 15,16,17). Now we can access the same data through the array_view objects (a and b) instead of the vector objects (vA and vB), and the added benefit is that we can capture the array_view objects in the lambda (lines 19-25) that we pass to the parallel_for_each call (line 18) and the data will get copied on demand for us to the accelerator.

Note that line 15 (and ditto for 16 and 17) could have been written as two lines instead of one:

  extent<2> e(M, W);
  array_view<const float, 2> a(e, vA);

In other words, we could have explicitly created the extent object instead of letting the array_view create it for us under the covers through the constructor overload we chose. The benefit of the extent object in this instance is that we can express that the data is indeed two dimensional, i.e a matrix. When we were using a vector object we could not do that, and instead we had to track via additional unrelated variables the dimensions of the matrix (i.e. with the integers M and W) – aren't you loving C++ AMP already?

Note that the const before the float when creating a and b, will result in the underling data only being copied to the accelerator and not be copied back – a nice optimization. A similar thing is happening on line 17 when creating array_view c, where we have indicated that we do not need to copy the data to the accelerator, through the discard_data call.

The kernel dispatch

On line 18 we make the call to the C++ AMP entry point (parallel_for_each) to invoke our parallel loop or, as some may say, dispatch our kernel.

The first argument we need to pass describes how many threads we want for this computation. For this algorithm we decided that we want exactly the same number of threads as the number of elements in the output matrix, i.e. in array_view c which will eventually update the vector vC. So each thread will compute exactly one result. Since the elements in c are organized in a 2-dimensional manner we can organize our threads in a two-dimensional manner too. We don't have to think too much about how to create the first argument (a extent) since the array_view object helpfully exposes that as a property. Note that instead of c.extent we could have written extent<2>(M, N) – the result is the same in that we have specified M*N threads to execute our lambda.

The second argument is a restrict(amp) lambda that accepts an index object. Since we elected to use a two-dimensional extent as the first argument of parallel_for_each, the index will also be two-dimensional and as covered in the previous posts it represents the thread ID, which in our case maps perfectly to the index of each element in the resulting array_view.

The kernel itself

The lambda body (lines 20-24), or as some may say, the kernel, is the code that will actually execute on the accelerator. It will be called by M*N threads and we can use those threads to index into the two input array_views (a,b) and write results into the output array_view ( c ).

The four lines (21-24) are essentially identical to the four lines of the serial algorithm (6-9). The only difference is how we index into a,b,c versus how we index into vA,vB,vC. The code we wrote with C++ AMP is much nicer in its indexing, because the dimensionality is a first class concept, so you don't have to do funny arithmetic calculating the index of where the next row starts, which you have to do when working with vectors directly (since they store all the data in a flat manner).

I skipped over describing line 20. Note that we didn't really need to read the two components of the index into temporary local variables. This mostly reflects my personal choice, in some algorithms to break down the index into local variables with names that make sense for the algorithm, i.e. in this case row and col. In other cases it may i,j,k or x,y,z, or M,N or whatever. Also note that we could have written line 24 as: c(idx[0], idx[1])=sum  or  c(row, col)=sum instead of the simpler c[idx]=sum

Targeting a specific accelerator

Imagine that we had more than one hardware accelerator on a system and we wanted to pick a specific one to execute this parallel loop on. So there would be some code like this anywhere before line 18:

  vector<accelerator> accs = MyFunctionThatChoosesSuitableAccelerators();
  accelerator acc = accs[0];

…and then we would modify line 18 so we would be calling another overload of parallel_for_each that accepts an accelerator_view as the first argument, so it would become:

  concurrency::parallel_for_each(acc.default_view, c.extent,

...and the rest of your code remains the same… how simple is that?


array and array_view from amp.h

Thu, September 8, 2011, 12:02 AM under GPGPU | ParallelComputing

This is a very long post, but it also covers what are probably the classes (well, array_view at least) that you will use the most with C++ AMP, so I hope you enjoy it!

Overview

The concurrency::array and concurrency::array_view template classes represent multi-dimensional data of type T, of N dimensions, specified at compile time (and you can later access the number of dimensions via the rank property). If N is not specified, it is assumed that it is 1 (i.e. single-dimensional case). They are rectangular (not jagged).array
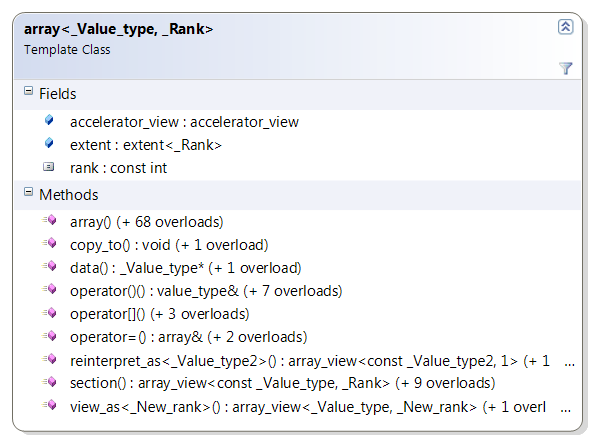
The difference between them is that array is a container of data, whereas array_view is a wrapper of a container of data. So in that respect, array behaves like an STL container, whereas the closest thing an array_view behaves like is an STL iterator (albeit with random access and allowing you to view more than one element at a time!).

The data in the array (whether provided at creation time or added later) resides on an accelerator (which is specified at creation time either explicitly by the developer, or set to the default accelerator at creation time by the runtime) and is laid out contiguously in memory. The data provided to the array_view is not stored by/in the array_view, because the array_view is simply a view over the real source (which can reside on the CPU or other accelerator). The underlying data is copied on demand to wherever the array_view is accessed. Elements which differ by one in the least significant dimension of the array_view are adjacent in memory.

array objects must be captured by reference into the lambda you pass to the parallel_for_each call, whereas array_view objects must be captured by value (into the lambda you pass to the parallel_for_each call). After you are done reading this post, feel free to visit another post dedicated to capturing data.

Creating array and array_view objects and relevant properties

You can create array_view objects from other array_view objects of the same rank and element type (shallow copy, also possible via assignment operator) so they point to the same underlying data, and you can also create array_view objects over array objects of the same rank and element type e.g.

  array_view<int,3> a(b); // b can be another array or array_view of ints with rank=3

Note: Unlike the constructors above which can be called anywhere, the ones in the rest of this section can only be called from CPU code.

You can create array objects from other array objects of the same rank and element type (copy and move constructors) and from other array_view objects, e.g.

  array<float,2> a(b); // b can be another array or array_view of floats with rank=2

To create an array from scratch, you need to at least specify an extent object, e.g. array<int,3> a(myExtent);. Note that instead of an explicit extent object, there are convenience overloads when N<=3 so you can specify 1-, 2-, 3- integers (dependent on the array's rank) and thus have the extent created for you under the covers. At any point, you can access the array's extent thought the extent property. The exact same thing applies to array_view (extent as constructor parameters, incl. convenience overloads, and property).

While passing only an extent object to create an array is enough (it means that the array will be written to later), it is not enough for the array_view case which must always wrap over some other container (on which it relies for storage space and actual content). So in addition to the extent object (that describes the shape you'd like to be viewing/accessing that data through), to create an array_view from another container (e.g. std::vector) you must pass in the container itself (which must expose .data() and a .size() methods, e.g. like std::array does), e.g.

  array_view<int,2> aaa(myExtent, myContainerOfInts);

Similarly, you can create an array_view from a raw pointer of data plus an extent object.

Back to the array case, to optionally initialize the array with data, you can pass an iterator pointing to the start (and optionally one pointing to the end of the source container) e.g.

  array<double,1> a(5, myVector.begin(), myVector.end());

We saw that arrays are bound to an accelerator at creation time, so in case you don’t want the C++ AMP runtime to assign the array to the default accelerator, all array constructors have overloads that let you pass an accelerator_view object, which you can later access via the accelerator_view property.

Note that at the point of initializing an array with data, a synchronous copy of the data takes place to the accelerator, and then to copy any data back we'll see that an explicit copy call is required. This does not happen with the array_view where copying is on demand...

refresh and synchronize on array_view

Note that in the previous section on constructors, unlike the array case, there was no overload that accepted an accelerator_view for array_view. That is because the array_view is simply a wrapper, so the allocation of the data has already taken place before you created the array_view. When you capture an array_view variable in your call to parallel_for_each, the copy of data between the non-CPU accelerator and the CPU takes place on demand (i.e. it is implicit, versus the explicit copy that has to happen with the array). There are some subtleties to the on-demand-copying that we cover next.array_view
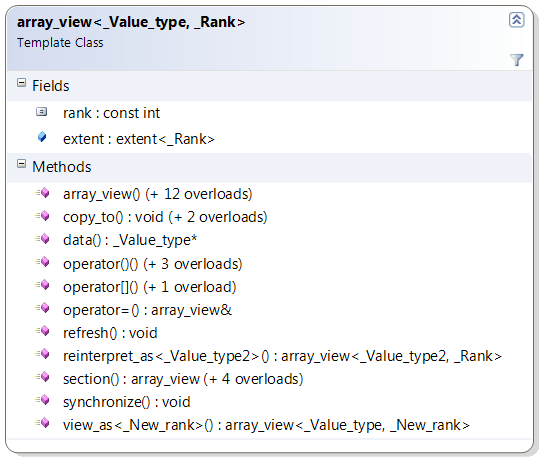
The assumption when using an array_view is that you will continue to access the data through the array_view, and not through the original underlying source, e.g. the pointer to the data that you passed to the array_view's constructor. So if you modify the data through the array_view on the GPU, the original pointer on the CPU will not "know" that, unless one of two things happen:

  • you access the data through the array_view on the CPU side, i.e. using indexing that we cover below
  • you explicitly call the array_view's synchronize method on the CPU (this also gets called in the array_view's destructor for you)

Conversely, if you make a change to the underlying data through the original source (e.g. the pointer), the array_view will not "know" about those changes, unless you call its refresh method.

Finally, note that if you create an array_view of const T, then the data is copied to the accelerator on demand, but it does not get copied back, e.g.

  array_view<const double, 5> myArrView(…); // myArrView will not get copied back from GPU

There is also a similar mechanism to achieve the reverse, i.e. not to copy the data of an array_view to the GPU.

copy_to, data, and global copy/copy_async functions

Both array and array_view expose two copy_to overloads that allow copying them to another array, or to another array_view, and these operations can also be achieved with assignment (via the = operator overloads).

Also both array and array_view expose a data method, to get a raw pointer to the underlying data of the array or array_view, e.g. float* f = myArr.data();. Note that for array_view, this only works when the rank is equal to 1, due to the data only being contiguous in one dimension as covered in the overview section.

Finally, there are a bunch of global concurrency::copy functions returning void (and corresponding concurrency::copy_async functions returning a future) that allow copying between arrays and array_views and iterators etc.

Note that for array, all copying described throughout this post is deep copying, as per other STL container expectations. You can never have two arrays point to the same data.

indexing into array and array_view plus projection

Reading or writing data elements of an array is only legal when the code executes on the same accelerator as where the array was bound to. In the array_view case, you can read/write on any accelerator, not just the one where the original data resides, and the data gets copied for you on demand. In both cases, the way you read and write individual elements is via indexing as described next.

To access (or set the value of) an element, you can index into it by passing it an index object via the subscript operator. Furthermore, if the rank is 3 or less, you can use the function ( ) operator to pass integer values instead of having to use an index object. e.g.

  array<float,2> arr(someExtent, someIterator); //or array_view<float,2> arr(someExtent, someContainer);
  index<2> idx(5,4);
  float f1 = arr[idx];
  float f2 = arr(5,4); //f2 ==f1
  //and the reverse for assigning, e.g.
  arr(idx[0], 7) = 6.9;

Note that for both array and array_view, regardless of rank, you can also pass a single integer to the subscript operator which results in a projection of the data, and (for both array and array_view) you get back an array_view of rank N-1 (or if the rank was 1, you get back just the element at that location).

Not Covered

In this already very long post, I am not going to cover three very cool methods (and related overloads) that both array and array_view expose: view_as, section, reinterpret_as. We'll revisit those at some point in the future, probably on the team blog.


parallel_for_each from amp.h – part 1

Tue, September 6, 2011, 07:52 PM under GPGPU | ParallelComputing

This posts assumes that you've read my other C++ AMP posts on index<N> and extent<N>, as well as about the restrict modifier. It also assumes you are familiar with C++ lambdas (if not, follow my links to C++ documentation).

Basic structure and parameters

Now we are ready for part 1 of the description of the new overload for the concurrency::parallel_for_each function. The basic new parallel_for_each method signature returns void and accepts two parameters:

  • a extent<N>
  • a restrict(amp) lambda, whose signature is such that it returns void and accepts an index of the same rank as the extent

So it looks something like this (with generous returns for more palatable formatting) assuming we are dealing with a 2-dimensional space:

  // some_code_A
  parallel_for_each(
    e, // e  is of type extent<2>
    [ ](index<2> idx) restrict(amp)
    {
      // kernel code
    }
  );
  // some_code_B

The parallel_for_each will execute the body of the lambda (which must have the restrict modifier), on the GPU. We also call the lambda body the "kernel". The kernel will be executed multiple times, once per scheduled GPU thread. The only difference in each execution is the value of the index object (aka as the GPU thread ID in this context) that gets passed to your kernel code. The number of GPU threads (and the values of each index) is determined by the extent object you pass, as described next.

In this context, one way to think about it is that the extent generates a number of index objects. So for the example above, if your extent was setup by some_code_A as follows:

  extent<2> e(2,3);

...then given that: e.size()==6, e[0]==2, and e[1]==3

...the six index<2> objects it generates (and hence the values that your lambda would receive) are:

   (0,0) (1,0) (0,1) (1,1) (0,2) (1,2)

So what the above means is that the lambda body with the algorithm that you wrote will get executed 6 times and the index<2> object you receive each time will have one of the values just listed above (of course, each one will only appear once, the order is indeterminate, and they are likely to call your code at the same exact time). Obviously, in real GPU programming, you'd typically be scheduling thousands if not millions of threads, not just 6.

If you've been following along you should be thinking: "that is all fine and makes sense, but what can I do in the kernel since I passed nothing else meaningful to it, and it is not returning any values out to me?"

Passing data in and out

It is a good question, and in data parallel algorithms indeed you typically want to pass some data in, perform some operation, and then typically return some results out. The way you pass data into the kernel, is by capturing variables in the lambda (again, if you are not familiar with them, follow the links about C++ lambdas), and the way you use data after the kernel is done executing is simply by using those same variables.

In the example above, the lambda was written in a fairly useless way with an empty capture list: [ ](index<2> idx) restrict(amp), where the empty square brackets means that no variables were captured.

If instead I write it like this [&](index<2> idx) restrict(amp), then all variables in the some_code_A region are made available to the lambda by reference, but as soon as I try to use any of those variables in the lambda, I will receive a compiler error. This has to do with one of the amp restrictions, where essentially only one type can be captured by reference: objects of the new concurrency::array class that I'll introduce in the next post (suffice for now to think of it as a container of data).

If I write the lambda line like this [=](index<2> idx) restrict(amp), all variables in the some_code_A region are made available to the lambda by value. This works for some types (e.g. an integer), but not for all, as per the restrictions for amp. In particular, no useful data classes work except for one new type we introduce with C++ AMP: objects of the new concurrency::array_view class, that I'll also introduce in the next post. Also note that if you capture some variable by value, you could use it as input to your algorithm, but you wouldn’t be able to observe changes to it after the parallel_for_each call (e.g. in some_code_B region since it was passed by value) – the exception to this rule is the array_view since (as we'll see in a future post) it is a wrapper for data, not a container.

Finally, for completeness, you can write your lambda, e.g. like this [av, &ar](index<2> idx) restrict(amp) where av is a variable of type array_view and ar is a variable of type array - the point being you can be very specific about what variables you capture and how.

So it looks like from a large data perspective you can only capture array and array_view objects in the lambda (that is how you pass data to your kernel) and then use the many threads that call your code (each with a unique index) to perform some operation. You can also capture some limited types by value, as input only. When the last thread completes execution of your lambda, the data in the array_view or array are ready to be used in the some_code_B region. We'll talk more about all this in future posts…

(a)synchronous

Please note that the parallel_for_each executes as if synchronous to the calling code, but in reality, it is asynchronous. I.e. once the parallel_for_each call is made and the kernel has been passed to the runtime, the some_code_B region continues to execute immediately by the CPU thread, while in parallel the kernel is executed by the GPU threads. However, if you try to access the (array or array_view) data that you captured in the lambda in the some_code_B region, your code will block until the results become available. Hence the correct statement: the parallel_for_each is as-if synchronous in terms of visible side-effects, but asynchronous in reality.


That's all for now, we'll revisit the parallel_for_each description, once we introduce properly array and array_view – coming next.


concurrency::extent from amp.h

Mon, September 5, 2011, 06:23 PM under GPGPU | ParallelComputing

Overview

We saw in a previous post how index<N> represents a point in N-dimensional space and in this post we'll see how to define the N-dimensional space itself. image

With C++ AMP, an N-dimensional space can be specified with the template class extent<N> where you define the size of each dimension.

From a look and feel perspective, you'd expect the programmatic interface of a point type and size type to be similar (even though the concepts are different). Indeed, exactly like index<N>, extent<N> is essentially a coordinate vector of N integers ordered from most- to least- significant, BUT each integer represents the size for that dimension (and hence cannot be negative).

So, if you read the description of index, you won't be surprised with the below description of extent<N>

  • There is the rank field returning the value of N you passed as the template parameter.
  • You can construct one extent from another (via the copy constructor or the assignment operator), you can construct it by passing an integer array, or via convenience constructor overloads for 1- 2- and 3- dimension extents. Note that the parameterless constructor creates an extent of the specified rank with all bounds initialized to 0.
  • You can access the components of the extent through the subscript operator (passing it an integer).
  • You can perform some arithmetic operations between extent objects through operator overloading, i.e. ==, !=, +=, -=, +, -.
  • There are operator overloads so that you can perform operations between an extent and an integer: -- (pre- and post- decrement), ++ (pre- and post- increment), %=, *=, /=, +=, –= and, finally, there are additional overloads for plus and minus (+,-) between extent<N> and index<N> objects, returning a new extent object as the result.

In addition to the usual suspects, extent offers a contains function that tests if an index is within the bounds of the extent (assuming an origin of zero). It also has a size function that returns the total linear size of this extent<N> in units of elements.

Example code

  extent<2> e(3, 4);
  _ASSERT(e.rank == 2);
  _ASSERT(e.size() == 3 * 4);
  e += 3;
  e[1] += 6;
  e = e + index<2>(3,-4);
  _ASSERT(e == extent<2>(9, 9));
  _ASSERT( e.contains(index<2>(8, 8)));
  _ASSERT(!e.contains(index<2>(8, 9)));


Usage

The extent class on its own simply defines the size of the N-dimensional space. We'll see in future posts that when you create containers (arrays) and wrappers (array_views) for your data, it is an extent<N> object that you'll need to use to create those (and use an index<N> object to index into them). We'll also see that it is a extent<N> object that you pass to the new parallel_for_each function that I'll cover in the next post.


concurrency::index from amp.h

Sun, September 4, 2011, 09:40 PM under GPGPU | ParallelComputing

Overview

C++ AMP introduces a new template class index, where N can be any value greater than zero, that represents a unique point in N-dimensional space, e.g. if N=2 then an index<2> object represents a point in 2-dimensional space. This class is essentially a coordinate vector of N integers representing a position in space relative to the origin of that space. It is ordered from most-significant to least-significant (so, if the 2-dimensional space is rows and columns, the first component represents the rows). The underlying type is a signed 32-bit integer, and component values can be negative.

The rank field returns N.

Creating an index

image

The default parameterless constructor returns an index with each dimension set to zero, e.g.

  index<3> idx; //represents point (0,0,0)

An index can also be created from another index through the copy constructor or assignment, e.g.

  index<3> idx2(idx); //or index<3> idx2 = idx;

To create an index representing something other than 0, you call its constructor as per the following 4-dimensional example:

  int temp[4] = {2,4,-2,0};
  index<4> idx(temp);

Note that there are convenience constructors (that don’t require an array argument) for creating index objects of rank 1, 2, and 3, since those are the most common dimensions used, e.g.

  index<1> idx(3);
  index<2> idx(3, 6);
  index<3> idx(3, 6, 12);

Accessing the component values

You can access each component using the familiar subscript operator, e.g.

One-dimensional example:

  index<1> idx(4);
  int i = idx[0]; // i=4

Two-dimensional example:

  index<2> idx(4,5);
  int i = idx[0]; // i=4
  int j = idx[1]; // j=5

Three-dimensional example:

  index<3> idx(4,5,6);
  int i = idx[0]; // i=4
  int j = idx[1]; // j=5
  int k = idx[2]; // k=6

Basic operations

Once you have your multi-dimensional point represented in the index, you can now treat it as a single entity, including performing common operations between it and an integer (through operator overloading): -- (pre- and post- decrement), ++ (pre- and post- increment), %=, *=, /=, +=, -=,%, *, /, +, -. There are also operator overloads for operations between index objects, i.e. ==, !=, +=, -=, +, –.

Here is an example (where no assertions are broken):

  index<2> idx_a;
  index<2> idx_b(0, 0);
  index<2> idx_c(6, 9);
  _ASSERT(idx_a.rank == 2);
  _ASSERT(idx_a == idx_b);
  _ASSERT(idx_a != idx_c);

  idx_a += 5;
  idx_a[1] += 3;
  idx_a++;
  _ASSERT(idx_a != idx_b);
  _ASSERT(idx_a == idx_c);

  idx_b = idx_b + 10;
  idx_b -= index<2>(4, 1);
  _ASSERT(idx_a == idx_b);

Usage

You'll most commonly use index<N> objects to index into data types that we'll cover in future posts (namely array and array_view). Also when we look at the new parallel_for_each function we'll see that an index<N> object is the single parameter to the lambda, representing the (multi-dimensional) thread index…

In the next post we'll go beyond being able to represent an N-dimensional point in space, and we'll see how to define the N-dimensional space itself through the extent<N> class.


concurrency::accelerator_view

Sat, September 3, 2011, 08:32 PM under GPGPU | ParallelComputing

Overview

We saw previously that accelerator represents a target for our C++ AMP computation or memory allocation and that there is a notion of a default accelerator. We ended that post by introducing how one can obtain accelerator_view objects from an accelerator object through the accelerator class's default_view property and the create_view method. concurrency::accelerator_view

The accelerator_view objects can be thought of as handles to an accelerator.

You can also construct an accelerator_view given another accelerator_view (through the copy constructor or the assignment operator overload). Speaking of operator overloading, you can also compare (for equality and inequality) two accelerator_view objects between them to determine if they refer to the same underlying accelerator.

We'll see later that when we use concurrency::array objects, the allocation of data takes place on an accelerator at array construction time, so there is a constructor overload that accepts an accelerator_view object. We'll also see later that a new concurrency::parallel_for_each function overload can take an accelerator_view object, so it knows on what target to execute the computation (represented by a lambda that the parallel_for_each also accepts).

Beyond normal usage, accelerator_view is a quality of service concept that offers isolation to multiple "consumers" of an accelerator. If in your code you are accessing the accelerator from multiple threads (or, in general, from different parts of your app), then you'll want to create separate accelerator_view objects for each thread.

flush, wait, and queuing_mode

When you create an accelerator_view via the create_view method of the accelerator, you pass in an option of queuing_mode_immediate or queuing_mode_automatic, which are the two members of the queuing_mode enum. At any point you can access this value from the queuing_mode property of the accelerator_view.

When the queuing_mode value is queuing_mode_automatic (which is the default), any commands sent to the device such as kernel invocations and data transfers (e.g. parallel_for_each and copy, as we'll see in future posts), will get submitted as soon as the runtime sees fit (that is the definition of immediate).

When the value of queuing_mode is queuing_mode_immediate, the commands will be submitted/flushed immediately.

To send all buffered commands to the device for execution, there is a non-blocking flush method that you can call. If you wish to block until all the commands have been sent, there is a wait method you can call (which also flushes). You can read more to understand C++ AMP's queuing_mode.

Querying information

Just like accelerator, accelerator_view exposes the is_debug and version properties. In fact, you can always access the accelerator object from the accelerator property on the accelerator_view class to access the accelerator interface we looked at previously.

Accelerator also exposes a function that helps you stay aware of the progress of execution. You can read more about accelerator_view::create_marker.

Interop with D3D (aka DX)

If your app that uses C++ AMP to compute data also uses DirectX rendering shaders, e.g. pixel shaders, you can benefit by integrating C++ AMP into your graphics pipeline. One of the building blocks for that is being able to use the same device context from both the compute kernel and the other shaders. You can do that by going from accelerator_view to device context (and vice versa), through part of our interop API in amp.h: *get_device, create_accelerator_view. You can read more on DirectX interop.


concurrency::accelerator

Wed, August 31, 2011, 07:12 PM under GPGPU | ParallelComputing

Overview

An accelerator represents a "target" on which C++ AMP code can execute and where data can reside. Typically (but not necessarily) an accelerator is a GPU device. Accelerators are represented in C++ AMP as objects of the accelerator class.concurrency::accelerator

For many scenarios, you do not need to obtain an accelerator object, since the runtime has a notion of a default accelerator, which is what it thinks is the best one in the system. Examples where you need to deal with accelerator objects are if you need to pick your own accelerator (based on your specific criteria), or if you need to use more than one accelerators from your app.

Construction and operator usage

You can query and obtain a std::vector of all the accelerators on your system, which the runtime discovers on startup.

Beyond enumerating accelerators, you can also create one directly by passing to the constructor a system-wide unique path to a device if you know it (i.e. the “Device Instance Path” property for the device in Device Manager), e.g. accelerator acc(L"PCI\\VEN_1002&DEV_6898&SUBSYS_0B001002etc");

There are some predefined strings (for predefined accelerators) that you can pass to the accelerator constructor (and there are corresponding constants for those on the accelerator class itself, so you don’t have to hardcode them every time). Examples are the following:

  • accelerator::default_accelerator represents the default accelerator that the C++ AMP runtime picks for you if you don’t pick one (the heuristics of how it picks one will be covered in a future post). Example: accelerator acc;
  • accelerator::direct3d_ref represents the reference rasterizer emulator that simulates a direct3d device on the CPU (in a very slow manner). This emulator is available on systems with Visual Studio installed and is useful for debugging. More on debugging in general in future posts. Example: accelerator acc(accelerator::direct3d_ref);
  • accelerator::direct3d_warp represents WARP which is the current CPU fallback. Example: accelerator acc(accelerator::direct3d_warp);
  • accelerator::cpu_accelerator represents the CPU. In this first release the only use of this accelerator is for using the staging arrays technique. Example: accelerator acc(accelerator::cpu_accelerator);

You can also create an accelerator by shallow copying another accelerator instance (via the corresponding constructor) or simply assigning it to another accelerator instance (via the operator overloading of =). Speaking of operator overloading, you can also compare (for equality and inequality) two accelerator objects between them to determine if they refer to the same underlying device.

Querying accelerator characteristics

Given an accelerator object, you can access its description, version, device path, size of dedicated memory in KB, whether it is some kind of emulator, whether it has a display attached, whether it supports double precision, and whether it was created with the debugging layer enabled for extensive error reporting.

Below is example code that accesses some of the properties; in your real code you'd probably be checking one or more of them in order to pick an accelerator (or check that the default one is good enough for your specific workload):

  vector<accelerator> accs = accelerator::get_all(); 
  std::for_each(accs.begin(), accs.end(), [] (accelerator acc) 
  { 
    std::wcout << "New accelerator: " << acc.description << std::endl; 
    std::wcout << "device_path = " << acc.device_path << std::endl; 
    std::wcout << "version = " << (acc.version >> 16) << '.' << (acc.version & 0xFFFF) << std::endl; 
    std::wcout << "dedicated_memory = " << acc.dedicated_memory << " KB" << std::endl; 
    std::wcout << "doubles = " << ((acc.supports_double_precision) ? "true" : "false") << std::endl; 
    std::wcout << "limited_doubles = " << ((acc.supports_limited_double_precision) ? "true" : "false") << std::endl; 
    std::wcout << "has_display = " << ((acc.has_display) ? "true" : "false") << std::endl;
    std::wcout << "is_emulated = " << ((acc.is_emulated) ? "true" : "false") << std::endl; 
    std::wcout << "is_debug = " << ((acc.is_debug) ? "true" : "false") << std::endl; 
    std::cout << std::endl; 
  }); 

accelerator_view

In my next blog post I'll cover a related class: accelerator_view. Suffice to say here that each accelerator may have from 1..n related accelerator_view objects. You can get the accelerator_view from an accelerator via the default_view property, or create new ones by invoking the create_view method that creates an accelerator_view object for you (by also accepting a queuing_mode enum value of queuing_mode_automatic or queuing_mode_immediate that we'll also explore in the next blog post).


"Hello World" in C++ AMP

Sun, June 26, 2011, 06:02 PM under GPGPU | ParallelComputing

UPDATE: I encourage you to visit a newer and better post with a C++ AMP matrix multiplication example.

Some say that the equivalent of "hello world" code in the data parallel world is matrix multiplication :)

Below is the before C++ AMP and after C++ AMP code. For more on what it all means, watch the recording of my C++ AMP introduction (the example below is part of the session).

    void MatrixMultiply(vector<float>& vC, 
			    const vector<float>& vA,
			    const vector<float>& vB, 
			    int M, int N, int W )
    {
        for (int y = 0; y < M; y++) 
        {
            for (int x = 0; x < N; x++) 
            {
                float sum = 0;
                for(int i = 0; i < W; i++)
                {
                    sum += vA[y * W + i] * vB[i * N + x];
                }
                vC[y * N + x] = sum;
	    }
        }
    }
Change the function to use C++ AMP and hence offload the computation to the GPU, and now the calling code (which I am not showing) needs no changes and the overall operation gives you really nice speed up for large datasets… 
    #include <amp.h>
    using namespace concurrency;

    void MatrixMultiply(vector<float>& vC, 
			    const vector<float>& vA,
			    const vector<float>& vB, 
			    int M, int N, int W )
    {
        array_view<const float,2>      a(M, W, vA);
        array_view<const float,2>      b(W, N, vB);
        array_view<writeonly<float>,2> c(M, N, vC); 

        parallel_for_each(
            c.grid,
            [=](index<2> idx) mutable restrict(direct3d) 
            {
                float sum = 0;
                for(int i = 0; i < a.x; i++) 
                {
                    sum += a(idx.y, i) * b(i, idx.x);
                }
                c[idx] = sum;
            }
        );
    }

Again, you can understand the elements above, by using my C++ AMP presentation slides and recording

Stay tuned for more…


C++ AMP recording and slides

Fri, June 17, 2011, 02:51 PM under Events | GPGPU | ParallelComputing

Yesterday we announced C++ Accelerated Massive Parallelism.

Many of you want to know more about the API instead of just meta information. I will trickle more code over the coming months leading up to the date when we will share actual bits. Until you have bits in your hand, it is only your curiosity that is blocked, so I ask you to be patient with that and allow me to release this on our own schedule ;-)

You can now watch my 45-minute session introducing C++ AMP on channel9. You will also want to download the slides (pdf), because they are not readable in the recording.


C++ Accelerated Massive Parallelism

Wed, June 15, 2011, 09:16 AM under GPGPU | ParallelComputing

At AMD's Fusion conference Herb Sutter announced in his keynote session a technology that our team has been working on that we call C++ Accelerated Massive Parallelism (C++ AMP) and during the keynote I showed a brief demo of an app built with our technology. After the keynote, I go deeper into the technology in my breakout session. If you read both those abstracts, you'll get some information about what C++ AMP is, without being too explicit since we published the abstracts before the technology was announced.

You can find the official online announcement at Soma's blog post.

Here, I just wanted to capture the key points about C++ AMP that can serve as an introduction and an FAQ. So, in no particular order…

C++ AMP

  1. lowers the barrier to entry for heterogeneous hardware programmability and brings performance to the mainstream, without sacrificing developer productivity or solution portability.
  2. is designed not only to help you address today's massively parallel hardware (i.e. GPUs and APUs), but it also future proofs your code investments with a forward looking design.
  3. is part of Visual C++. You don't need to use a different compiler or learn different syntax.
  4. is modern C++. Not C or some other derivative.
  5. is integrated and supported fully in Visual Studio 11. Editing, building, debugging, profiling and all the other goodness of Visual Studio work well with C++ AMP.
  6. provides an STL-like library as part of the existing concurrency namespace and delivered in the new amp.h header file.
  7. makes it extremely easy to work with large multi-dimensional data on heterogeneous hardware; in a manner that exposes parallelization.
  8. introduces only one core C++ language extension.
  9. builds on DirectX (and DirectCompute in particular) which offers a great hardware abstraction layer that is ubiquitous and reliable. The architecture is such, that this point can be thought of as an implementation detail that does not surface to the API layer.

Stay tuned on my blog for more over the coming months where I will switch from just talking about C++ AMP to showing you how to use the API with code examples…


Speaking at AMD Fusion conference

Thu, June 9, 2011, 05:44 PM under Events | ParallelComputing

UPDATE: C++ AMP session recording and slides now available.

Next Wednesday at 2pm I will be presenting a session at the AMD Fusion developer summit in Bellevue, Washington State.

For more on this conference please visit the official website. If you filter the catalog by 'Speaker Last Name' to "Moth", you'll find my talk.

For your convenience, below is the title and abstract

Blazing-fast code using GPUs and more, with Microsoft Visual C++

To get full performance out of mainstream hardware, high-performance code needs to harness, not only multi-core CPUs, but also GPUs (whether discrete cards or integrated in the processor) and other compute accelerators to achieve orders-of-magnitude speed-up for data parallel algorithms. How can you as a C++ developer fully utilize all that heterogeneous hardware from your Visual Studio environment? How can your code benefit from this tremendous performance boost without sacrificing your developer productivity or the portability of your solution? The answers will be presented in this session that introduces a new technology from Microsoft.

Hope to see many of you there!


Are you at Super Computing 10?

Sat, November 13, 2010, 07:09 PM under Events | HPC | ParallelComputing

Like last year, I was going to attend SC this year, but other events are unfortunately keeping me here in Seattle next week. If you are going to be in New Orleans, have fun and be sure not to miss out on the following two opportunities.

MPI Debugging UX Study

Throughout the week, my team is conducting 90-minute studies on debugging MPI applications within Visual Studio. In exchange for your feedback (under NDA) you will receive a Microsoft Gratuity (and the knowledge that you are impacting the development of Visual Studio). If you are interested, sign up at the Microsoft Information Desk in the Exhibitor Hall during exhibit hours. Outside of exhibit hours, send email to tcur@microsoft.com. If you took part in the GPGPU study, this is very similar except it is for MPI.

Microsoft High Performance Computing Summit

On Monday 15th, the Microsoft annual user group meeting takes place. Shuttle transportation and lunch is provided. For full details of this event and to register, please visit the official event page.


Dryad and DryadLINQ from MSR

Sat, November 13, 2010, 07:06 PM under HPC | ParallelComputing

Microsoft Research (MSR) researches technologies, incubates projects which many times result in technology that looks like a ready-to-use product (but it is important to understand that these are not the same as products built by the various… actual product teams here at Microsoft).

A very popular MSR project has been DryadLINQ, which itself builds on Dryad. To learn more follow the project pages I just linked to and I also recommend this 1-hour channel 9 video. If you only have 3 minutes, watch this great elevator pitch instead. You can also stay tuned on the official blog, which includes a post that refers to internal adoption e.g by Bing, a quick DryadLINQ code example, and some history on how DryadLINQ generalizes the MapReduce pattern and makes it accessible to regular programmers (see this post and that post).

Essentially, the DryadLINQ framework (building on the Dryad runtime) allows developers to re-use their LINQ skills for creating/generating programs that process large multi-gigabyte/terabyte datasets across 100s-1000s of machines. One way to think about it is that just as Parallel LINQ allows LINQ developers to seamlessly use multiple cores from a single process on a single machine, DryadLINQ allows LINQ developers to seamlessly use multiple machines for their data parallel algorithms. In the former scenario the motivation was speed of execution, in the latter it is speed of execution AND processing large datasets that simply don't fit on a single machine.

Whenever I hear about execution of parallel code on multiple machines on the Microsoft platform, I immediately think of Windows HPC Server. Indeed Dryad and DryadLINQ were made available for Windows HPC Server and I encourage you to watch the PDC session on this topic: Data-Intensive Computing on Windows HPC Server with the DryadLINQ Framework.

Watch this space…


PPL and TPL sessions on channel9

Fri, September 24, 2010, 12:21 AM under ParallelComputing

Back in June there was an internal conference in Redmond ("Engineering Forum") aimed at Microsoft engineers, and delivered by Microsoft engineers. I was asked to put together a track on Multi-Core development, so I picked 6 parallelism experts and we created 6 awesome sessions (we won the top spot in the Top 10 :-)). Two of the speakers kept the content fairly external-friendly, so we received permission to publish their recordings publicly.

Enjoy (best to download the High Quality WMV):

  1. Don McCrady - Parallelism in C++ Using the Concurrency Runtime
  2. Stephen Toub - Implementing Parallel Patterns using .NET 4

To get notified on future videos on parallelism (or to browse the archive) stay tuned on this channel9 parallel computing feed.


DirectCompute Lectures

Sun, August 29, 2010, 10:34 PM under GPGPU | ParallelComputing

Previously I shared resources to get you started with DirectCompute, for taking advantage of GPGPUs in an a way that doesn't tie you to a hardware vendor (e.g. nvidia, amd).

I just stumbled upon and had to share a lecture series on channel9 on DirectCompute!

Here are direct links to the episodes that are up there now:

  1. DirectCompute Expert Roundtable Discussion
  2. DirectCompute Lecture Series 101- Introduction to DirectCompute
  3. DirectCompute Lecture Series 110- Memory Patterns
  4. DirectCompute Lecture Series 120- Basics of DirectCompute Application Development
  5. DirectCompute Lecture Series 210- GPU Optimizations and Performance
  6. DirectCompute Lecture Series 230- GPU Accelerated Physics
  7. DirectCompute Lecture Series 250- Integration with the Graphics Pipeline

Having watched these I recommend them all, but if you only want to watch a few, I suggest #2, #3, #4 and #5. Also, you should download the "WMV (High)" so you can see the code clearly and be able to Ctrl+Shift+G for fast playback…

TIP: To subscribe to channel9 GPU content, use this RSS feed.


Are you a GPGPU developer? Participate in our UX study

Sat, July 31, 2010, 02:12 PM under GPGPU | ParallelComputing | UserInterfaceDesign

You know that I work on the parallel debugger in Visual Studio and I've talked about GPGPU before and I have also mentioned UX. Below is a request from my UX colleagues that pulls all of it together.

If you write and debug parallel code that uses GPUs for non-graphical, computationally intensive operations keep reading. The Microsoft Visual Studio Parallel Computing team is seeking developers for a 90-minute research study. The study will take place via LiveMeeting or at a usability lab in Redmond, depending on your preference.

We will walk you through an example of debugging GPGPU code in Visual Studio with you giving us step-by-step feedback. ("Is this what you would you expect?", "Are we showing you the things that would help you?", "How would you improve this")

The walkthrough utilizes a “paper” version of our current design. After the walkthrough, we would then show you some additional design ideas and seek your input on various design tradeoffs.

Are you interested or know someone who might be a good fit? Let us know at this address: devur@microsoft.com. Those who participate (and those who referred them), will receive a gratuity item from a list of current Microsoft products.


Join our team at Microsoft

Wed, June 30, 2010, 05:10 PM under ParallelComputing

If you are looking for a SDE or SDET job at Microsoft, keep on reading.

Back in January I posted a Dev Lead opening on our team, which was quickly filled internally (by Maria Blees). Our team is part of the recently announced Microsoft Technical Computing group. Specifically, we are working on new debugger functionality, integrated with Visual Studio (we are starting work on the next version), aimed to address HPC and GPGPU scenarios (and continuing the Parallel Debugging scenarios we started addressing with VS2010).

We now have many more openings on our debugger team. We posted three of those on the careers website:

  1. Software Development Engineer
  2. Software Development Engineer II
  3. Software Development Engineer in Test II (don't let the word "Test" fool you: An SDET on our team is no different than a developer in any way, including the skills required)

Please do read the contents of the links above. Specifically, note that for both positions you need to be as proficient in writing C++ code as you are with managed code (WPF experience is a plus).

If you think you have what it takes, you wish to join a quality and schedule driven project, and want to contribute features to a product that has global impact, then send me your resume and I'll pass it on to the hiring managers.


Microsoft Technical Computing

Mon, May 31, 2010, 11:33 PM under ParallelComputing

In the past I have described the team I belong to here at Microsoft (Parallel Computing Platform) in terms of contributing to Visual Studio and related products, e.g. .NET Framework. To be more precise, our team is part of the Technical Computing group, which is still part of the Developer Division. This was officially announced externally earlier this month in an exec email (from Bob Muglia, the president of STB, to which DevDiv belongs). Here is an extract:

"…

As we build the Technical Computing initiative, we will invest in three core areas:

1. Technical computing to the cloud: Microsoft will play a leading role in bringing technical computing power to scientists, engineers and analysts through the cloud. Existing high- performance computing users will benefit from the ability to augment their on-premises systems with cloud resources that enable ‘just-in-time’ processing. This platform will help ensure processing resources are available whenever they are needed—reliably, consistently and quickly.

2. Simplify parallel development: Today, computers are shipping with more processing power than ever, including multiple cores, but most modern software only uses a small amount of the available processing power. Parallel programs are extremely difficult to write, test and trouble shoot. However, a consistent model for parallel programming can help more developers unlock the tremendous power in today’s modern computers and enable a new generation of technical computing. We are delivering new tools to automate and simplify writing software through parallel processing from the desktop… to the cluster… to the cloud.

3. Develop powerful new technical computing tools and applications: We know scientists, engineers and analysts are pushing common tools (i.e., spreadsheets and databases) to the limits with complex, data-intensive models. They need easy access to more computing power and simplified tools to increase the speed of their work. We are building a platform to do this. Our development efforts will yield new, easy-to-use tools and applications that automate data acquisition, modeling, simulation, visualization, workflow and collaboration. This will allow them to spend more time on their work and less time wrestling with complicated technology.

"

Our Parallel Computing Platform team is directly responsible for item #2, and we work very closely with the teams delivering items #1 and #3.

At the same time as the exec email, our marketing team unveiled a website with interviews that I invite you to check out: Modeling the World.


Visual Studio 2010 released!

Mon, April 12, 2010, 08:07 AM under ParallelComputing | VisualStudio

Visual Studio 2010 releases to the world today. Get the full story from Soma's blog post (inc. links for buy, try etc).

Our team is very proud of what we have contributed to this release and you can learn more about it through our content on the Parallel Computing MSDN home.


Microsoft Windows HPC Server R2 Beta2

Mon, April 12, 2010, 08:05 AM under HPC | ParallelComputing

Internally and unofficially we refer to this as "HPC Server v3" and its Beta2 became available last week. Read the full story on this blog post from Ryan and this one from Don.

There has been a lot of excitement on the web for this release with coverage from last Wednesday here, here, here, here, here and here.

Don't forget that Visual Studio 2010 makes it easy to develop for HPC Server including the MPI Cluster Debugger integration that I explained here and here.


Parallel Computing Platform Developer Lab

Sat, March 13, 2010, 05:20 AM under Events | ParallelComputing

This is an exciting announcement that I must share:

"Microsoft Developer & Platform Evangelism, in collaboration with the Microsoft Parallel Computing Platform product team, is hosting a developer lab at the Platform Adoption Center on April 12-15, 2010.  This event is for Microsoft Partners and Customers seeking to incorporate either .NET Framework 4 or Visual C++ 2010 parallelism features into their new or existing applications, and to gain expertise with new Visual Studio 2010 tools including the Parallel Tasks and Parallel Stacks debugger toolwindows, and the Concurrency Visualizer in the profiler.

Opportunities for attendees include:

  • Gain expert design assistance with your Parallel Computing Platform based solution.
  • Develop a solution prototype in collaboration with Microsoft Software Engineers.
  • Attend topical presentations and “chalk-talk” sessions.
  • Your team will be assigned private, secure offices for confidential collaboration activities.

The event has limited capacity, thus enrollment is based on an application process.   Please download and complete the application form then return it to the event management team per instructions included within the form.  Applications will be evaluated based upon the technical solution scenario along with indicated project readiness timelines.  Microsoft event management team members may contact you directly for additional clarification and discussion of your project scenario during the nomination process."


Slides and code for MPI Cluster Debugger

Tue, March 2, 2010, 07:01 AM under ParallelComputing | HPC
I've blogged before about the MPI Cluster Debugger in VS2010 that facilitates launching the application on the cluster and attaching the debugger (btw, a shorter version of the screencast I link to there, is here).

There have been requests for the code I use in the screencast, so please find a ZIP with that code.

There have also been requests for a PowerPoint deck to use when showing this feature to others. Feel free to download some slides I threw together the other day.

DirectCompute

Fri, February 19, 2010, 04:00 PM under ParallelComputing | GPGPU
In my previous blog post I introduced the concept of GPGPU ending with:
On Windows, there is already a cross-GPU-vendor way of programming GPUs and that is the Direct X API. Specifically, on Windows Vista and Windows 7, the DirectX 11 API offers a dedicated subset of the API for GPGPU programming: DirectCompute. You use this API on the CPU side, to set up and execute the kernels on the GPU. The kernels are written in a language called HLSL (High Level Shader Language). You can use DirectCompute with HLSL to write a "compute shader", which is the term DirectX uses for what I've been referring to in this post as "kernel".
In this post I want to share some links to get you started with DirectCompute and HLSL.

1. Watch the recording of the PDC 09 session: DirectX11 DirectCompute.

2. If session recordings is your thing there are two more on DirectCompute from nvidia's GTC09 conference 1015 (pdf, mp4) and 1411 (mp4 plus the presenter's written version of the session).

3. Over at gamedev there is an old Compute Shader tutorial. At the same site, there is a 3-part blog post on Compute Shader: Introduction, Resources and Addressing.

4. From PDC, you can also download the DirectCompute Hands On Lab.

5. When you are ready to get your hands even dirtier, download the latest Windows DirectX SDK (at the time of writing the latest is dated Feb 2010).

6. Within the SDK you'll find a Compute Shader Overview and samples such as: Basic, Sort, OIT, NBodyGravity, HDR Tone Mapping.

7. Talking of DX11/DirectCompute samples, there are also a couple of good ones on this URL.

8. The documentation of the various APIs is available online. Here are just some good (but far from complete) taster entry points into that: numthreads, SV_DispatchThreadID, SV_GroupThreadID, SV_GroupID, SV_GroupIndex, D3D11CreateDevice, D3DX11CompileFromFile, CreateComputeShader, Dispatch, D3D11_BIND_FLAG, GSSetShader.

GPGPU

Fri, February 19, 2010, 03:58 PM under ParallelComputing | GPGPU
What
GPU obviously stands for Graphics Processing Unit (the silicon powering the display you are using to read this blog post). The extra GP in front of that stands for General Purpose computing.

So, altogether GPGPU refers to computing we can perform on GPU for purposes beyond just drawing on the screen. In effect, we can use a GPGPU a bit like we already use a CPU: to perform some calculation (that doesn’t have to have any visual element to it). The attraction is that a GPGPU can be orders of magnitude faster than a CPU.

Why
When I was at the SuperComputing conference in Portland last November, GPGPUs were all the rage. A quick online search reveals many articles introducing the GPGPU topic. I'll just share 3 here: pcper (ignoring all pages except the first, it is a good consumer perspective), gizmodo (nice take using mostly layman terms) and vizworld (answering the question on "what's the big deal").

The GPGPU programming paradigm (from a high level) is simple: in your CPU program you define functions (aka kernels) that take some input, can perform the costly operation and return the output. The kernels are the things that execute on the GPGPU leveraging its power (and hence execute faster than what they could on the CPU) while the host CPU program waits for the results or asynchronously performs other tasks.

However, GPGPUs have different characteristics to CPUs which means they are suitable only for certain classes of problem (i.e. data parallel algorithms) and not for others (e.g. algorithms with branching or recursion or other complex flow control). You also pay a high cost for transferring the input data from the CPU to the GPU (and vice versa the results back to the CPU), so the computation itself has to be long enough to justify the overhead transfer costs. If your problem space fits the criteria then you probably want to check out this technology.

How
So where can you get a graphics card to start playing with all this? At the time of writing, the two main vendors ATI (owned by AMD) and NVIDIA are the obvious players in this industry. You can read about GPGPU on this AMD page and also on this NVIDIA page. NVIDIA's website also has a free chapter on the topic from the "GPU Gems" book: A Toolkit for Computation on GPUs.

If you followed the links above, then you've already come across some of the choices of programming models that are available today. Essentially, AMD is offering their ATI Stream technology accessible via a language they call Brook+; NVIDIA offers their CUDA platform which is accessible from CUDA C. Choosing either of those locks you into the GPU vendor and hence your code cannot run on systems with cards from the other vendor (e.g. imagine if your CPU code would run on Intel chips but not AMD chips). Having said that, both vendors plan to support a new emerging standard called OpenCL, which theoretically means your kernels can execute on any GPU that supports it. To learn more about all of these there is a website: gpgpu.org. The caveat about that site is that (currently) it completely ignores the Microsoft approach, which I touch on next.

On Windows, there is already a cross-GPU-vendor way of programming GPUs and that is the DirectX API. Specifically, on Windows Vista and Windows 7, the DirectX 11 API offers a dedicated subset of the API for GPGPU programming: DirectCompute. You use this API on the CPU side, to set up and execute the kernels that run on the GPU. The kernels are written in a language called HLSL (High Level Shader Language). You can use DirectCompute with HLSL to write a "compute shader", which is the term DirectX uses for what I've been referring to in this post as a "kernel". For a comprehensive collection of links about this (including tutorials, videos and samples) please see my blog post: DirectCompute.

Note that there are many efforts to build even higher level languages on top of DirectX that aim to expose GPGPU programming to a wider audience by making it as easy as today's mainstream programming models. I'll mention here just two of those efforts: Accelerator from MSR and Brahma by Ananth.

Code for Parallelism Features Tour

Fri, February 5, 2010, 10:54 PM under ParallelComputing
Last year I linked to a screencast that shows off many VS2010 features delivered by the Parallel Computing team.

There have been requests for the code used to demonstrate the features. Like with all my screencasts, you can see all the code in action, so you could simply type it in. To save you doing that though, you may download the two files with the demo code here: MM.cs and Program.cs. HTH.

Dev Lead Job opening on my team

Sun, January 3, 2010, 11:00 PM under ParallelComputing
My product unit (Parallel Developer Tools) is hiring a developer lead here in Redmond. This position is specifically on the debugger feature team that I "Program Manage".

So, if you have what it takes and don't mind working with me every single day, click on the link below to read more and apply. You can also send me your resume and I'll make sure it gets to the right place and that you get a prompt response.

There is a very long job description on the Microsoft careers site under job id 707388.

Here is an excerpt from the middle (emphasis mine):
"...
We are in search of a talented and innovative senior lead software design engineer to own development of the debugging tools for data parallelism (including GP-GPU) and HPC Clusters being built by our team.

To be successful, you need to be able to guide careers, design and architect well, communicate and share the best development practices, collaborate with your peers, contribute to the vision, and code significant portions of the solution. We want to hear from you if you're passionate about making your mark in the parallel development space, improving people, and building world-class tools."

Responsibilities include:
Managing a team of senior and junior developers
Design and coding high-quality software
..."

For the full background story, requirements, qualifications and responsibilities please visit the official page.

Parallel Computing Features Tour in VS2010

Tue, November 17, 2009, 03:26 PM under ParallelComputing
Just realized that I have not linked from here to a screencast I recorded a couple weeks ago that shows the API, parallel debugger and concurrency visualizer in VS2010. Take a few minutes to watch the VS2010 Parallel Computing Features Tour.

MPI Cluster Debugger launch integration in VS2010

Sat, November 14, 2009, 11:55 PM under ParallelComputing | HPC
Let's assume that you have all the HPC bits installed and that you have existing MPI code (or you created a "Hello World" project using the MPI project template). Of course, you create a single MPI application and at runtime it will correspond to multiple processes (of the same app) launched on multiple nodes (i.e. machines) on the cluster. So how do you debug such a situation by simply hitting the familiar "F5" keystroke (i.e. Debug -> Start Debugging)?

WATCH IT INSTEAD OF READING ABOUT IT
If you can't bear to read through all the details below, just watch this 19-minute screencast explaining this VS2010 feature. Alternatively, or even additionally, keep on reading.

REQUIREMENT
When you debug an MPI application, you would want the copying of resources from your client machine (where Visual Studio is installed) to each compute node (where Windows HPC Server is installed) to take place automatically for you. 'Resources' in the previous sentence includes your application binary, plus any binary or data dependencies it may have, plus PDBs if needed, plus the debug CRT of the correct bitness, plus msvsmon for remote debugging to work. You would also want, after copying is complete, to have your app and msvsmon launched and attached so that you can hit breakpoints back in Visual Studio on your client machine. All these thing that you would want are delivered in VS2010.

STEPS TO F5
1. In your MPI project where you have placed a breakpoint go to Project Properties -> Configuration Properties -> Debugging. Ensure the "Debugger to launch" combo box value is set to MPI Cluster Debugger.

2. There are a whole bunch of properties here and typically you can ignore all of them except one: Run Environment. By default it is set to run 1 process on your local machine and if you change the number after that to, for example, 4 it will launch 4 processes of your app on your local machine.

You want this to run on your cluster though, so go to the dropdown arrow at the end of the Run Environment cell and open it to expose the "Edit Hpc node" menu which opens the Node Selector dialog:

In this dialog you can enter (or pick from a list) the cluster head node name and then the number of processes you want to execute on the cluster and then hit OK and… you are done.

3. Press F5 and watch your breakpoint get hit (after giving it some time for copying, remote execution, attachment and symbol resolution to take place).

GOING DEEPER
In the MPI Cluster Debugger project properties above, you can see many additional properties to the Run Environment. They are all optional, but you may want to understand them in order to fine tune your cluster debugging. Read all about each one of these on the MSDN page Configuration Properties for the MPI Cluster Debugger.

In the Node Selector dialog above you can see more options than just the Head Node name and Number of Process to run. They should be self-explanatory but I also cover them in depth in my screencast showing you an example of why you would choose to schedule processes per core versus per node. You can also read about these options on MSDN as part of the page How to: Configure and Launch the MPI Cluster Debugger.

To read through an example that touches on MPI project creation, project properties, node selector, and also usage of MPI with OpenMP plus MPI with PPL, read the MSDN page Walkthrough: Launching the MPI Cluster Debugger in Visual Studio 2010.

Happy MPI debugging!

Parallel Debugging

Thu, November 12, 2009, 09:06 PM under ParallelComputing
Using Visual Studio 2010 parallel debugging is easy. Two new debugging windows provide a total view of the internals of your PPL and TPL applications with hints on where to start investigations. These are not mere extensions to VS, but tightly integrated with the rest of the debugger experience, so you don't need to learn many new techniques. Use them in your program to eclipse bugs from existence!

One of the most FAQ I receive is links to VS2010 parallel debugging content and rather than keep sending many, I decided to gather them all under one permalink, hence this multi link blog post.

- MSDN Magazine article on Parallel Debugging.
- Screencast of sample code from the article.

- MSDN Walkthrough: Debugging a Parallel Application (VB, C++, C#).
- Screencast of walkthrough for Parallel Stacks.
- Screencast of walkthrough for Parallel Tasks.

- MSDN "How To" on Parallel Tasks.
- MSDN "How To" on Parallel Stacks.

- Detailed blog post on Parallel Tasks.
- Detailed blog post on Parallel Stacks.
- Detailed blog post on Parallel Stacks - Tasks View.
- Detailed blog post on Parallel Stacks - Method View.

- Download slides on Parallel Tasks and Parallel Stacks (pptx).

If you have questions on these, please post to any of the parallel computing forums or the debugging forum (your question will be routed to me if nobody else can answer it).

Message Passing Interface (MPI)

Wed, November 11, 2009, 04:01 PM under ParallelComputing | HPC
So you have installed your cluster and you are done with introductory material on Windows HPC. Now you want to develop an application with the most common programming model: Message Passing Interface.

The MPI programming model is a standard with implementations from many vendors. For newbies (like myself!), I have aggregated below links for getting started.

Non-Microsoft MPI resources (useful even if you are not on the Windows platform)
1. Message Passing Interface on wikipedia.

2. The MPI standard.
3. MPICH2 - an MPI implementation.
4. Tutorial on MPI by William Gropp.
5. MPI patterns presented as a tutorial with sample code.

6. THE official MPI Forum (maintains the standard) including the wiki discussing the MPI future.

7. Great MPI tutorial including at the end the MPI Exercise.

8. C++ MPI Exercises by John Burkardt.

9. Book online: MPI The Complete Reference.


MS-MPI
10. Windows HPC Server 2008 - Using MS-MPI whitepaper (15 page doc).

11. Tracing MPI applications (27 page doc).

12. Using Microsoft MPI (TechNet section).

13. Windows HPC Server MPI forum (for posting questions).


MPI.NET
14. MPI.NET Home Page (not owned by Microsoft).
15. MPI.NET Tutorial.

16. HPC Development using F# using MPI.NET (38 page doc).


Next time I'll post resources for the Microsoft Cluster SOA programming model - happy coding...

Windows HPC Server links

Tue, November 10, 2009, 07:27 PM under ParallelComputing | HPC
I've already described how to setup a Windows HPC Server for development. Before you dive into developing for the cluster, if you are new to this it is probably a good idea to learn the basics by reading some overview material. Below is a list of links.

Direct Links to Windows HPC content
1. Windows HPC Server 2008 Overview Datasheet (4 page pdf).

2. Windows HPC Server 2008 Technical Overview (32 page doc).

3. Windows HPC Server 2008 Getting Started Guide (26 page doc) which actually is available online as part of the TechNet technical library section on Windows HPC Server 2008, which includes much more useful data.

4. Windows HPC Server 2008 Job Scheduler (38 page doc).
5. Windows HPC Server 2008 Job Templates (56 page doc).

6. Developing for the Windows HPC Server 2008 Platform (16 page doc or pdf version).


Windows HPC sites
7. Windows HPC Forums.

8. HPC Developer Resources.

9. Windows HPC Server 2008 Resource Kit - Developer.

10. Windows HPC Server 2008 - TechNet.

11. The Windows HPC Team Blog.


HPC Course
12. High-Performance Computing Fundamentals Course (pluralisight)
13. Classic HPC Development using Visual C++ (course slides and materials in a ZIP). Author's blog post.
14. From sequential to parallel code (course slides and materials in a ZIP). Author's blog post.


Next time I will post resources specific to the most popular programming models for the cluster today: MPI and Cluster SOA - until then, happy reading!

Dump debugging with Parallel Stacks

Sun, November 8, 2009, 01:57 PM under ParallelComputing
One of the areas where we fixed many bugs for Beta2 in our parallel debugging windows is with regards to managed dump debugging. So it was really cool to see Tess use the Parallel Stacks window in that scenario in her video demo with Scott.

Other than the neat ability to open managed dumps in VS2010, Parallel Stacks was the only debugging feature she needed for diagnosing the issue! Check out the video, definitely worth 10 minutes of your time.

Slides for Parallel Debugging windows

Sat, November 7, 2009, 07:50 PM under ParallelComputing
Recently I gave a talk at our Microsoft Shanghai offices on Parallel Programming so I had to update my existing Beta1 deck to Beta2 content. Specifically for Parallel Tasks and Parallel Stacks, I used 5 slides to accompany the demo.

In case you are giving talks on parallelism within Visual Studio 2010, please feel free to download and use the updated parallel debugger slides (pptx).

TIP: The slides have animations so be sure to F5 the deck for the full benefit and they also have text in the Comments section so be sure to see them at design time too.

MPI Project Template for VS2010

Fri, November 6, 2009, 08:54 PM under ParallelComputing | HPC
If you are developing MS MPI applications with Visual Studio 2010, you are probably tired of following some tedious steps for every new C++ project that you create, similar to the following:
1. In Solution Explorer, right-click YourProjectName, then click Properties to open the Property Pages dialog box.

2. Expand Configuration Properties and then under VC++ Directories place the cursor at the beginning of the list that appears in the Include Directories text box and then specify the location of the MS MPI C header files, followed by a semicolon, e.g.
C:\Program Files\Microsoft HPC Pack 2008 SDK\Include;

3. Still under Configuration Properties and under VC++ Directories place the cursor at the beginning of the list that appears in the Library Directories text box and then specify the location of the Microsoft HPC Pack 2008 SDK library file, followed by a semicolon, e.g.
if you want to build/debug 32bit application:
C:\Program Files\Microsoft HPC Pack 2008 SDK\Lib\i386;
if you want to build/debug 64bit application:
C:\Program Files\Microsoft HPC Pack 2008 SDK\Lib\amd64;

4. Under Configuration Properties and then under Linker, select Input and place the cursor at the beginning of the list that appears in the Additional Dependencies text box and then type the name of the MS MPI library, i.e.
msmpi.lib;

5. In the code file
#include "mpi.h"

6. To debug the MPI project you have just setup, under Configuration Properties select Debugging and then switch the Debugger to launch combo value from Local Windows Debugger to MPI Cluster Debugger.
Wouldn't it be great if at C++ project creation time you could choose an MPI Project Template that included the steps/configurations above? If you answered "yes", I have good news for you courtesy of a developer on our team (Qing).

Feel free to download from Visual Studio gallery the MPI Project Template.

Positioning the Parallel Stacks window

Thu, October 22, 2009, 08:22 PM under ParallelComputing
When we developed the Parallel Debugging windows, we had to choose their default position in Visual Studio. For Parallel Tasks it was easy: we chose wherever the Threads window appears by default, since the two windows share characteristics in usage and appearance. Parallel Stacks may be similar to the basic concept of the Call Stack window, but it has slightly different usage patterns and very different UI. Here I'll describe our rational for the current choice for the Parallel Stacks window, offering tips and request feedback.

It was more challenging that just picking a position at random, especially due to the window having high screen real estate demands for typical applications – after all, it is a graphical view of all the call stacks of all the threads/tasks in your application. So, we quickly dismissed having it docked at the bottom or top since those are typically narrow in height windows. Some of us believed that the document editor area would be a good place for it since it has more screen real estate to offer. That approach breaks down when you realize that the Parallel Stacks window is not just presenting data, but it also allows you to quickly switch to any stack frame of any thread (with a double click). When that user action takes place, the code editor navigates to the method context and thus steals the focus from the Parallel Stacks window which gets pushed to the back (this also happens when you simply toggle the "Show External Code" option). So if you want to navigate to various places in the code via a series of examinations, that position quickly becomes irritating (just like if you docked Solution Explorer in the code editor area).

So we decided the default position to be floating! The idea is that you can resize it based on your preferences and move it in and out of the way if necessary: you get to see as much of it as you want and you keep it on top of other windows (typically to the right side). The real expectation is that you will drag the floating window to your second monitor and maximize it there.

Two other options came close to be chosen and I'll offer them here as tips in case they suit you better (in particular if you don't have a second monitor or when debugging on the go on your laptop). One is to dock it within the document editor, but in a New Vertical Tab Group. This way it takes up the space it typically needs, while keeping your code editor in view when you switch stack frames.


The other option is to dock the Parallel Stacks window where the Solution Explorer window lives. That way you can resize that group of windows horizontally to see more content (and use for navigation) without taking too much away from your code view (assuming your lines of code are not extremely long). When you are done using it, you can quickly resize it back to normal.


It is amazing how much thought/discussion goes into, what many people would consider, an insignificant detail, but that is the kind of thing I enjoy, which I guess is why I do what I do. In any case, I am eager to hear how we got this decision wrong, so please let me know.

Parallel Tasks and Parallel Stacks content updated for VS2010 Beta2

Mon, October 19, 2009, 08:59 AM under ParallelComputing
For VS2010 Beta2, rather than write new introductory and overview posts on my two favorite debugger windows (Parallel Tasks and Parallel Stacks), I thought I’d update 4 of the existing blog posts on those topics.

Please read the updated text and enjoy the updated screenshots
- Parallel Tasks
- Parallel Stacks
- Parallel Stacks – Tasks View
- Parallel Stacks – Method View

Also, I have updated the recordings behind the screencast URLs on channel9:
- Parallel Stacks
- Parallel Tasks

Each one of the links above has a comment section, feel free to use it for feedback and questions!

Installing HPC Server 2008

Sun, October 18, 2009, 08:47 PM under ParallelComputing | HPC
Recently I decided to play around with developing for a cluster on the Microsoft platform and below are the steps I had to take with regards to installation.

First I gathered a number of old machines at the office, in my case that is 3 dual-core boxes, but you could have done it with just 2 PCs (or many more of course). On each one of those you must install: Windows HPC Server 2008 (link to trial)
a. This includes a trial of the Windows Server 2008 RTM 64-bit operating system (SRVHPC_EN.iso). I already had Windows Server on a separate disc, so I installed what I had. I did not try R2, which is the same code base as Win7, but that should work too. Note that this is just the vanilla operating system (even Standard Edition is good enough) and the important part is the 64-bit. I will assume that you are all capable of installing an OS, so no more instruction or special consideration needed here (window update, join domain, add users etc).

b. The second part of the link above is an add-on to the operating system, namely the HPC Pack 2008 (HPCEval.iso). It is a wizard with a set of steps to complete which are all fairly explanatory of the "click Next" flavor. After installation of the HPC Pack, the HPC Cluster Manager application runs up automatically (or else you can run it through the Start menu) for further step-by-step configuration in an easy to follow outofthebox To-do List.


Here are some tips for step b from above, for your developer cluster setup:
i) In the HPC Pack wizard, you will create one of the machines as the Head Node.

ii) In the HPC Pack wizard, the remainder machines will be created as the Compute Nodes.

iii) In Cluster Manager, click on "Configure your network" and choose topology 5 "All Nodes only on an Enterprise Network".

iv) In Cluster Manager, click on "Add compute nodes" and then select "Add compute nodes that have already been configured".

v) In Cluster Manager, click "Change the role of the head node" and also make it a WCF Broker Node.

vi) In Cluster Manager, "Validate your cluster" under Diagnostics.

It may be useful to cross-reference the text above with the following screenshot of HPC Cluster Manager


Now that your cluster is installed, you need to set up your development machine (x86 or x64) for developing on this cluster. Here are the things you need to install:
1. Visual Studio 2010

2. HPC Pack 2008. This is essentially the same msi you installed on the server (step b above), but here you will choose the 3rd option Client Utilities (which will probably be your only enabled option as per my screenshot further above).

3. HPC Pack 2008 SDK. This allows writing client applications that interact with the Job Scheduler running on the Head Node. MSDN has a dedicated page to the HPC SDK.

4. (optional) Install the separate MPI Project Template, for VS2010.

You are now ready to develop your cluster applications on your development machine and to debug/deploy them on your cluster. More on that in future blog posts.

Parallelizing a loop with tasks, avoiding the pitfall

Tue, October 13, 2009, 02:39 PM under ParallelComputing
Most readers of this blog should know that it is extremely easy to parallelize loops with .NET 4. So serial code performing matrix multiplication like this:
    for (int i = 0; i < size; i++)
{
for (int j = 0; j < size; j++)
{
int tmp = 0;
for (int k = 0; k < size; k++)
{
tmp += m1[i, k] * m2[k, j];
}
result[i, j] = tmp;
}
}
…can be parallelized like this:
      Parallel.For(0, size, (int i) =>
{
for (int j = 0; j < size; j++)
{
int tmp = 0;
for (int k = 0; k < size; k++)
{
tmp += m1[i, k] * m2[k, j];
}
result[i, j] = tmp;
}
});
How about parallelizing the code using Tasks directly (instead of indirectly)? The clever thing to do is somehow partition the data (statically or dynamically) and assign chunks to tasks, but even the naïve approach of one task per outer iteration is better than nothing:
    Task[] tasks = new Task[size];
for (int i = 0; i < size; i++)
{
tasks[i] = Task.Factory.StartNew(() =>
{
for (int j = 0; j < size; j++)
{
int tmp = 0;
for (int k = 0; k < size; k++)
{
tmp += m1[i, k] * m2[k, j];
}
result[i, j] = tmp;
}
});
}
Task.WaitAll(tasks);
Can you see the issue with the code above?

TIP: the issue has nothing to do with tasks, threads or even .NET 4. It has to do with anonymous methods since the day they were introduced. The clue is that the following snippet fixes the issue:
    Task[] tasks = new Task[size];
for (int n = 0; n < size; n++)
{
int i = n;
tasks[n] = Task.Factory.StartNew(() =>
{
for (int j = 0; j < size; j++)
{
int tmp = 0;
for (int k = 0; k < size; k++)
{
tmp += m1[i, k] * m2[k, j];
}
result[i, j] = tmp;
}
});
}
Task.WaitAll(tasks);
If you know the reason please move along. If however this was news to you, go read the entire page (and the outbound links) on stackoverflow.

By the way, we could have fixed the snippet with this approach too, since tasks accept a state parameter:
    Task[] tasks = new Task[size];
for (int i = 0; i < size; i++)
{
tasks[i] = Task.Factory.StartNew(ii =>
{
int iii = (int)ii;
for (int j = 0; j < size; j++)
{
int tmp = 0;
for (int k = 0; k < size; k++)
{
tmp += m1[iii, k] * m2[k, j];
}
result[iii, j] = tmp;
}
}, i);
}
Task.WaitAll(tasks);
More on why you may choose to pass the variable as state instead of capturing it, in a future post.

MSDN Mag: Parallel Debugging in VS2010

Wed, September 9, 2009, 06:14 PM under ParallelComputing
The September issue of the MSDN Magazine has gone live online and the article I co-authored is also available.

Warning: contains screenshots of VS2010 Beta2 that is not released yet ;-)

Enjoy: Debugging Task-Based Parallel Applications in Visual Studio 2010.

VS2010 Beta1 demos on parallelism

Thu, August 20, 2009, 11:44 PM under ParallelComputing
Recently I updated the slides of my parallelism session to match the Visual Studio 2010 Beta1 bits.

In this post I'd like to share the demos from that session, also updated for .NET 4 Beta1 (my motto is "better late than never" ;-)

Download my demo code files here at your own risk.

The RayTracer sample can be downloaded along with other parallel extension samples.

HPC Debugging and Profiling support

Fri, August 14, 2009, 12:31 PM under ParallelComputing
Not sure how many subscribers to this blog are HPC developers, but it is an area I will be covering more next year as I am expanding my responsibilities to include the High Performance Computing domain (which obviously falls under the parallelism umbrella). To get a taste of the kind of work we are talking about, read Soma's blog post on the current tooling offerings in that space.

STM.NET

Fri, August 14, 2009, 12:25 PM under ParallelComputing
Hopefully developers on the Microsoft platform subscribe to the announcements on Soma's blog; if you don't, you may have missed this post pointing to the STM.NET dev lab project (this is the 2nd devlab project released from my extended team, the 1st being Axum). If Software Transactional Memory is your interest, stay tuned on the team's blog.

( after seeing their logo, I'll now try to take out of my mind the Atomic tune )

Parallel Tasks and Parallel Stacks windows making your debugging life easier

Fri, August 14, 2009, 12:04 PM under ParallelComputing
As I was catching up with my RSS reader I found two posts on John Robbins' blog worth mentioning.

One of them starts with a screenshot and mention of my team's Parallel Stacks window – check out John's blog post on easier multithreaded debugging.

The other blog post offers a macro for the very common requirement to Freeze All Threads But the one of interest. The good news for those of you adopting the task-based programming model is that this is a menu item on the ContextMenu of the new Parallel Tasks window (see last screenshot at the bottom).

Updated Beta1 slides for parallelism

Thu, July 2, 2009, 06:56 PM under ParallelComputing
For those of you interested in my session on parallelism with VS2010, I gave an extended/longer version of it recently and included a bunch of new slides and updated the existing ones to match the recent release of VS2010 Beta1. Get the updated pptx here (checkout the annotated slides 16 and 17 on Parallel Tasks and Parallel Stacks).

Parallel Stacks and Parallel Tasks screencasts

Wed, June 17, 2009, 04:52 PM under ParallelComputing
Whether you have read or not my blog posts on the new Visual Studio 2010 debugger windows, you now have the option of seeing them in action in these videos I published on channel9: 17-minute screencast on Parallel Stacks and 14-minute screencast on Parallel Tasks.

If you don't like watching videos and you don't like reading about features, maybe you prefer the guided hands on approach. Launch your VS2010 instance and go through my walkthrough published on MSDN.

Parallel Stacks – Method View

Sat, June 6, 2009, 03:24 PM under ParallelComputing
This post was UPDATED for the VS2010 Beta 2 release

The new Parallel Stacks window has a special feature (that applies to both Threads View and Tasks View) that we call Method View. It is accessible from the toolbar and it acts on the current stack frame (i.e. the only one with a green arrow icon or, in the absence of that, the one with the yellow arrow). It takes that method and pivots the diagram on it, coalescing all occurrences of that method into a single node in the center, clearly showing the callees and the callers. Threads that do not have that method on their stack are filtered out and not shown. Check out the before and after screenshots:

Switching to another stack frame in Method View will result in that method context becoming the "center of attention", and hence potentially some threads will disappear and others will re-appear on the diagram. The view persists cross debugging sessions (just like all the other options) and to get out of it you simply need to click on the Method View toolbar button again and return to Stack View.

Parallel Stacks – Tasks view

Wed, May 27, 2009, 04:12 PM under ParallelComputing
This post was UPDATED for the VS2010 Beta 2 release

This blog post presumes you read my posts on Parallel Tasks and on Parallel Stacks, which describe the usefulness of the new VS2010 debugger windows for debugging multithreaded applications. In today's post I'll expand on the task-specific support in the Parallel Stacks window: we call this the Tasks View of the Parallel Stacks window and you can switch to that view from the combobox in the toolbar.


Threads versus Tasks
For the purposes of this window, there are 3 main differences when you are looking at call stacks of threads versus call stacks of tasks:

1. Some threads in your application will be running tasks and others will not.
2. A thread could be running more than 1 Task (only the task at the top part of the thread's call stack is actually running, you can assert that the other(s) would be in a waiting state).
3. Call stacks of threads are mapped back to the thread via the Thread ID; call stacks of tasks should be mapped back to the task via the Task ID.

These 3 differences map to the following 3 observations of what you see in the Tasks View of the Parallel Stacks window (compared to the separately covered Threads View of the Parallel Stacks window):

a) We don’t show the threads not executing tasks.
b) We split call stacks of threads executing multiple tasks into separate nodes, so you can clearly see each task call stack separately.
c) The tooltip of the header in the node and on each method context (displaying the stack frames) shows task IDs instead of thread IDs.

Here is an example where one thread is not running tasks (the Main thread):


Trimming frames from the bottom
You will notice in the screenshot above another difference not mentioned so far: some stack frames at the root of the call stack are trimmed. This is what I call showing the "real" call stacks of tasks. If you think about it, your code created a task pointing it to a method and it is from somewhere close to that method that you want to start looking at the call stack. All the other (typically non-user code) stack frames at the root of the thread's call stack are not of interest in this Tasks View, so we trim them out (as per screenshot above).

Trimming frames from the top
We also trim stack frames from the top of the call stack. The consistent decision could have been to trim *all* non-user code at the top since that is not code you would typically care too much about when debugging tasks. However, what is interesting in many scenarios is the first non-user method that was called from the top most user frame – so we kept that one frame and trimmed all the ones above it.

Here is an example of trimming stack frames from the top and also of a thread running 2 tasks:


"Go To Thread" and "Go To Task" menu
Before anyone panics with the stack trimming I mentioned above, remember that you can always view entire thread call stacks in this window by switching to the Threads View. In fact, we made it even easier to switch not just view, but also scroll to the exact position you want by offering a menu item (you'll recall I left that out from my context menu description last time) that switches views and scrolls to the same stack frame you are looking in the other view.

Header Icon
The header of each node shows the count of Threads or Tasks depending on the view we are on (default Threads View or Tasks View). In Tasks View, it also shows the task Status icon if a task's topmost frame ends in that node. You can see that in the previous screenshot: the node with 1 running task has the running icon; the two nodes each with a waiting task have the waiting icon; the node with 2 tasks has none that "end" in that box, so it shows no icon in the header.

Header tooltip
I mentioned the method context tooltip showing task IDs instead of thread IDs and you can see that in the screenshot below. I also mentioned the header tooltip showing task IDs instead of thread IDs; for this tooltip we threw in bonus information by showing you the Status of each task including counts for each status grouping regardless of whether there is an icon showing in the header or not (and if there are more than one appdomain in your app, we show the appdomain ID next to the task ID)


Feedback Please
Start playing with Visual Studio 2010 and let me have it!

Parallel Stacks – another new VS2010 debugger window

Wed, May 20, 2009, 01:19 PM under ParallelComputing
This post was UPDATED for the VS2010 Beta 2 release

Assumed knowledge aka Background Reading
It is important to understand some of the existing Call Stack window features. Even if you don't care about this VS2010 feature, you can improve your debugging skills with any version of Visual Studio by reading that blog post.

Parallel Stacks debugger toolwindow
With applications increasingly having more than one thread and with parallelism gaining momentum, we need the ability to view (and navigate) more than 1 call stack from a single view. Previously I discussed the motivation behind this new window here, and I'll use the exact same code for the following screenshots. Here is the new Parallel Stacks window:

In the picture above you can see the call stacks of 3 threads in a single view. The way you read this picture is that you have one thread that went from Main to A to B. Two other threads started from the same external code and then went to A, but one of them continued to B and then to some external code, and the other continued to C and then some AnonymousMethod. This is also the active stack frame and this is the current thread.

Toolbar buttons from left to right
Threads/Tasks combobox: Switches the view between showing call stacks of threads to showing call stacks of Tasks (and vice versa). More on the Tasks view of the Parallel Stacks window in another post.

Show Only Flagged: Shows call stacks only for the threads that are flagged in the Threads window.

Toggle Method View: Switches between normal view and method view. Method view is the subject of a separate post.

Auto Scroll To Current Stack Frame: Auto-scrolls the diagram so the current stack frame is in view. Useful in large diagrams when changing the current stack frame via other windows or when hitting a new breakpoint.

Toggle Zoom Control: Shows or hides the zoom control. Note that zooming is always available via Ctrl+mousewheel.

Context Menu Items in random order
The last 5 menuitems are borrowed directly from the Call Stack window and introduce no new behaviors: Go To Source Code, Go To Disassembly, Show External Code, Hexadecimal Display, Symbol Load Information and Symbol Settings.

Go To Task (Thread): This performs the same function as the combobox on the toolbar does, but additionally keeps the same stack frame highlighted. It will be discussed in a separate post.

Switch To Frame: Same as menuitem on Call Stack window. Additionally, with Parallel Stacks, multiple frames may correspond to a method context so the menuitem has submenus, each representing a specific stack frame. If one of the stack frames is on the current thread (so by definition you are clicking on a node with a blue highlight around it) then that stack frame has a checkmark in front of it. For example, right clicking on Program.A and expanding the first menuitem results in this screenshot:


Annotations and Elements Listed
Call Stack Segment or Node: Each "box" contains a series of method contexts for one or more threads. If the node has no arrow lines connected to it, then it represents the entire call path for the thread(s), otherwise you need to follow the arrows to piece together the entire call path of a thread.

Blue Highlight: The blue highlight indicates the call path to which the current thread belongs to.

Arrow lines: Arrow lines connect nodes to make up the entire call path for the thread(s).

Tooltip on Node Header: The tooltip on each node shows the ID(s) and name(s) of the thread(s) relevant to the node.


Method Context: Represents one or more stack frames in the same method.

Tooltip on method context: The tooltip on each method context shows the full details of all the stack frames it represents. If one of the stack frames is also on the current thread, it is shown in bold font.


Yellow Arrow Icon: A yellow arrow in front of a method context indicates that the active stack frame of the current thread is in that method context. As you'd expect, this icon would appear only at the last frame in a node that also has the blue highlight around it.

Cloth Threads Icon: A cloth threads icon in front of a method context indicates that the active stack frame of a non-current thread is in that method context. As you'd expect, this icon would appear only at the last frame in a node and there would be no blue highlight.

Green Arrow Icon: A green arrow in front of a method context indicates that the current stack frame is in that method context. That method context is also in bold font, and as you'd expect is in a node with a blue highlight. If the method context appears in other places/nodes on the diagram, it is bolded there too. E.g., if in the context menu shown above, we clicked on menuitem '4284: Program.A("hi") Line 19' we would be switching thread and current frame on that thread with a single action, resulting in the picture looking like this:


Navigation Aids
Bird's Eye View: When there are scrollbars present, the space between the scrollbars reveals a button that when pressed shows a thumbnail view of the picture which you can use to quickly scroll around it.

Zoom Control: The zoom control lets you zoom in and out, zoom to fit and zoom to 100%.

Panning: Pressing the mouse button on any white space and dragging, will scroll the diagram.

Call to Action
The call to action is identical to the Call to Action of my post on Parallel Tasks. Read it and come back here to comment ;-)

Tasks documentation

Tue, May 19, 2009, 08:11 AM under ParallelComputing
Interested in the System.Threading.Tasks namespace? Read here the official MSDN documentation.

Parallel Tasks – new Visual Studio 2010 debugger window

Fri, May 15, 2009, 02:55 AM under ParallelComputing
This post was UPDATED for the VS2010 Beta 2 release

Assumed knowledge aka Background Reading
.NET 4 introduces a new class that lives in mscorlib that I have blogged about before: System.Threading.Tasks.Task, which as you'll recall is also what Parallel.For depends on. Collectively, all those new classes is what we refer to as Task Parallel Library and the team that owns it has blogged what is new for TPL in Beta1. Another .NET 4 feature I blogged about before also depends on Tasks for its implementation: Parallel LINQ. The same team owns that and there is a blog post of what is new for PLINQ in Beta1.

If you are a C++ developer, then you'll be happy to know that the task concept also exists in C++ version 10 that ships with VS2010. In addition to the dedicated native concurrency blog I just linked to, there is a ch9 video on the topic.

Parallel Tasks debugger toolwindow
To support the new task-based programming model introduced with Visual Studio 2010 for both managed and native developers, we are introducing a new debugger window: Parallel Tasks. You can open it after you hit a breakpoint, via the same location where all debugger windows live.


Sorting, Reordering, Hiding/Showing columns
Columns are re-orderable (by dragging them left/right) and sortable (by clicking on them) as indicated by the little triangle, which also shows the sort direction. You can also hide or show columns by right clicking on any column and then (un)checking the column menuitem of interest


Grouping on a column
Via the context menu shown above you can group on your column of choice. What is cool about grouping is that it allows you to flag an entire group with one click (more on flagging later), it allows you to collapse the group (preserved between debugging steps) and it shows a count of the items in the group (even when it is collapsed).


Description of the 9 Columns
- Flag Column: Each item can be in a flagged or non-flagged state (the default). You can toggle the state of a row by clicking on the corresponding cell. You would do this to make it easier to keep an eye on an item of interest between debugging steps (e.g. breakpoints, F11) or to flag multiple items and then sort on the column to bring them all to the top. Flagging is not persisted between debugging sessions. Another use of flagging is to filter the task call stacks shown in the new Parallel Stacks window, but that is a topic of another blog post.

- Icon Column: This column is blank by default except for one Task which will have a yellow arrow in this cell. The yellow arrow indicates which one is the current task. The current task is one which is executing on the current thread and you can switch current task just like switching current thread. The task which is current when you first break under the debugger is known as the "breaking task" and is indicated by a white hollow arrow icon (only visible after you switch task, of course). Another icon that can be displayed in this column is the "pause" icon to indicate a frozen thread (more on freezing further down).

- Id: Each Task has a unique Id which can be retrieved programmatically by calling the Id property (for C++ tasks, this will be the memory address). This is useful so you can map the task you are seeing in the window with diagnostic output you may send to some stream; it is also useful for cross-referencing tasks between the Parallel Tasks and the Parallel Stacks windows (which I'll describe in another post).

- Status: The 4 potential values here are Running, Scheduled, Waiting and Waiting-Deadlocked. "Running" are the tasks that are executing code at the moment your app breaks in the debugger (they are at top of stack of a running thread); "Scheduled" are the ones that are sitting in some queue but have not been executed by a thread yet; "Waiting" are the ones that have run, but are now blocked on something, e.g. a Monitor, a critical section; "Waiting-Deadlocked" are the ones that are "Waiting" and additionally we have detected a wait chain with other tasks in the list. For the 2 Waiting states, hovering over the cell displays a tooltip which may have more information, like in the following screenshot.


- Location: The Location column displays the method that the task is currently in (i.e. the top most user frame of the task's call stack). Hovering over the cell displays in a stacktip the entire call stack for the task (not the entire call stack for the thread!) and from the stacktip you can even switch the current stack frame by double clicking on your chosen one. Naturally, Scheduled tasks do not have a value in this column.


- Task: The entry point method that was passed to the task when it was constructed. If there was a state argument explicitly passed to the task, the value of that is also shown.

- Thread Assignment: The ID and name of the thread that the task is executing on. Remember, a task can only execute on a single thread, but a thread can be executing multiple tasks. Naturally, Scheduled tasks do not have a value in this column.

- Parent: The Id of the task that is the parent of this task (if there is one showing in the list). This is not applicable for native scenarios where the concept of parent and child tasks is not a first class citizen in the programming model.

- AppDomain: This column shows the AppDomain ID of the AppDomain in which the task belongs to (assuming you created more than one AppDomain). This is not applicable for native scenarios.

- Task Group: The address of the task_group that scheduled the task. This is not applicable for managed scenarios.

Parent Child View
When the value of any cell in the Parent column is not blank, we know we have parent child relationship(s) in our view. In that case, we can visualize this relationship slightly better by switching to "Parent Child View" via the column context menu (shown in image further above). This switches the first column to contain a treeview that allows collapsing the child nodes/tasks.


Task Context Menu
The ContextMenu described above is the one displayed when right clicking on a column; there is one that is displayed when right clicking on a (task) listviewitem.
- Copy: Copies the cells in view (tab delimited) to the clipboard.
- Select All: Or via Ctrl+A to select all tasks, in order to perform one of the other operations in bulk, e.g. copying.
- Hexadecimal Display: Global debugger setting that switches all debugger windows to hexadecimal display (or Decimal if unchecked).
- Switch To Task: Sets the selected task to be the current task (as discussed above) and hence get the yellow arrow icon. This action is also performed when double clicking on a Task listviewitem.
- Freeze Assigned Thread: The concept of freezing a thread existed before this Visual Studio release via the Threads window. The thread that is frozen does not continue execution when the debugger continues to the next step, until the user Thaws it (via the same menu). From the Parallel Tasks window, freezing affects the underlying thread and all tasks on it. I.e. this is still a thread concept rather than a task concept.
- Freeze All Threads But This: Freezes all threads in view, except the selected one.
- Flag: Same behaviour as clicking on the flag column, described further above.


Call to Action
When you get the Visual Studio 2010, let me know what you think about this new debugger window as you write your own task-based algorithms: do you like it or do you love it? ;-) More seriously, I am genuinely interested in your bug reports (so the talented developers on my team can fix them for future releases), what feature do you particularly like (so we make sure not to lose/break it) and what you'd like to see that is not there (so we can include it for the next release).

Axum

Sat, May 9, 2009, 02:01 PM under ParallelComputing
My colleagues have released to DevLabs an incubation project: Axum (fka "Maestro").
"Axum aims to validate a safe and productive parallel programming model for .NET"

" Axum is a language that builds upon the architecture of the Web and principles of isolation, actors, and message-passing to increase application safety, responsiveness, scalability, and developer productivity.
Other advanced concepts we are exploring are data flow networks, asynchronous methods, and type annotations for taming side-effects."

After you visit the page and download the bits, head over to the dedicated Axum blog.

Parallelism in Greek

Mon, February 23, 2009, 04:53 PM under Events | ParallelComputing
During my working_from_Greece stint over the Christmas and New Year's period, I squeezed in presenting at an event in Athens. Parts of the recorded presentation are now available on the Greek MSDN pages. Scroll down the page to choose between the 2 presentations


The 1st presentation was this one. The 2nd presentation was a (interactive) Greek version of the code-heavy Parallel Programming session.

Finally, for those of you physically living in Greece, there is a 2-page article/interview on parallel computing in February's PC Magazine.

Why Care About Parallelism aka The Inevitable Shift

Sun, February 15, 2009, 09:56 PM under ParallelComputing
That was the title of a 45-minute (inc. questions) presentation I gave last December. It was a basic introduction to the manycore shift including what is parallelism and why software developers should care. The session ended by touching at a very high level on what Microsoft is doing in this space.

It was slides only (well, there were 3 demo/sample apps shown but no code) and you can download the deck in a ZIP file (the slides are a montage from many other decks of other Microsoft employees).

The basic flow has as follows
slide 3: Understanding Moore's Law
slide 4-7: Moore's law is still alive, but is not translated to higher frequencies. That is mainly due to the power wall, which at the end of the day means more heat than the CPU manufacturers can deal with
slide 8: So instead the manycore shift enters with CPU manufacturers adding more cores to the die rather than making a single one go faster. Predictions are for 100-core machines within 5 years (for the record, these are not my predictions)
slide 9: For us software developers, to take advantage of the increased total horsepower of manycore machines (on the client/desktop) you must employ parallelism. No other magic bullet or automatic gain. It is naïve to think that we will not need the increased speed or that we don’t know what to do with it:
a. We have been taking advantage (implicitly or explicitly) of increased CPU speeds over our entire existence. Why do we think we'll stop now?
b. Every shift in the software industry (whether it is the move from console to GUI apps, or desktop to mobile apps or even the recent client side web programming advancements) has been partly possible due to being able to take advantage of higher processor speeds. Why will the next shift in computing (whatever that is) be different?
slide 10: DEMO the morphing application (same one I showed at Tech Ed EMEA)
slide 11: Important to note that not all of the additional cores will be as fast as today's CPUs – they will more likely be of lower frequency; so to get even the same output that we get from one core today, we'll have to use parallelism to leverage more than one cores.
slide 12: Also important to note that it isn’t just Microsoft telling this story. Virtually every industry player is predicting the same situation.
slide 13: So the question is: what do I do with all those cores? Besides the same goals that good multithreading has (responsiveness, scalability and latency-awareness) parallelism takes it to the next level.
slide 14 to 15: Obey Amdahl's Law: do the same thing, but genuinely faster
slide 16: Obey Gustafson's law: do more stuff in the same time!
slide 17: Use speculative execution.
slide 18: DEMO the RayTracer application (same one I showed at PDC)
slide 19: "OK, I am sold. I must use parallelism. Show me how"… "Well, actually it is darn hard today if you try and use traditional multithreading to achieve parallelism"
slide 20: Microsoft established the Parallel Computing Initiative to address the goals/symptoms above
slide 21: Not the only team in Microsoft thinking about this problem. Attacking it from many angles.
slide 22: DEMO Baby Names application
slide 23: I bet you want to see some code… Read the Summary slide, and let's move on to the next session.

Give a session on Parallel Programming (or just learn from it)

Thu, February 5, 2009, 02:15 PM under ParallelComputing
Last year gave the same session on Parallel Programming twice: at PDC2008 and Tech Ed EMEA 2008 (identical content). The fact that those sessions ended up on the #3 and #2 spots in the ranking order, speaks to the fact that people are really interested and accepting of this topic. It is also testament that the technology Microsoft is releasing with Visual Studio 2010 is very compelling. So I invite you here to take my content and reuse it in your local regions!

The recordings (and slides) of the two identical sessions are available so you can learn by watching them: links from here and here.

I have also captured the session content on this blog:

1. Briefly introduce the manycore shift and clarify the release vehicle for Parallel Extensions.
2. Run one of the samples that ship with Parallel Extensions to demonstrate the end user benefit (no code shown at this point).
3. Clarify the potential difference between parallelism and multi-threading.
4. DEMOnstrate Fine Grained Parallelism via the Task-based Programming model built on the new ThreadPool.
5. DEMOnstrate Debugging Parallel Applications.
6. DEMOnstrate Structured Parallelism via the static Parallel class, e.g. Imperative Data Parallelism.
7. DEMOnstrate Declarative Data Parallelism: PLINQ.

Many conferences/user groups are interested in technical sessions on Parallel Programming in .NET 4.0 and Visual Studio 2010 so use the links above to learn and share.

PLINQ

Sun, January 25, 2009, 06:59 PM under ParallelComputing | LINQ
With VS2008 (more specifically .NET Framework 3.5) a wonderful thing was introduced: LINQ. Given the declarative nature of Language Integrated Query it was a prime candidate for trying to inject automatic parallelization in it (i.e. to run faster by seamlessly taking advantage of multiple cores). The result of those efforts is what I mentioned 18 months ago (Parallel LINQ) and followed with a screencast 4 months later: see the 2nd link in the list here. In this post I'll do a written overview based on the latest bits. Before we continue, you should understand that PLINQ applies only to LINQ to Objects (i.e. IEnumerable-based sources where lambdas are bound to delegates, not IQueryable-based sources where the lambdas are bound to expressions). It also does not interfere with the deferred execution principles of LINQ, of course.

PLINQ as a black box
PLINQ is really simple if you want to treat it as a black box; all you do as a user is add the .AsParallel extension method to the source of you LINQ query and you are done! The following query
var result =
from x in source
where [some condition]
select [something]
...can be parallelized as follows:
var result =
from x in source.AsParallel()
where [some condition]
select [something]
Notice that the only difference is the AsParallel method call appended to the source and we can of course use this pattern with more complex queries.

Why Does It Work
To understand why the above compiles we have to remind ourselves of how LINQ works and that the first version of the code above is really equivalent to:
var result =  source.Where(x => [some condition]).Select(x => [something]);
...so when we parallelize it we are simply changing it to be the following:
var result =  source.AsParallel().Where(x => [some condition]).Select(x => [something]);
In other words the call to AsParallel returns something that also has the typical extension methods of LINQ (e.g. Where, Select and the other 100+ methods). However, with LINQ these methods live in the static System.Linq.Enumerable class whereas with PLINQ they live in the System.Linq.ParallelEnumerable class. How did we transition from one to the other? Well, AsParallel is itself an extension method on IEnumerable types and all it does is a "smart" cast of the source (the IEnumerable) to a new type which means the extension methods of this new type are picked up (instead of the ones directly on IEnumerable). In other words, by inserting the AsParallel method call, we are swapping out one implementation (Enumerable) for another (ParallelEnumerable). And that is why the code compiles fine when we insert the AsParallel method. For a more precise understanding, in the VS editor simply right click on AsParallel, choose Go To Definition and follow your nose from there…

How Does It Work
OK, so we can see why the above compiles when we change the original sequential query with our parallelised query, which we now understand is based on the introduction of new .NET 4 types such as ParallelQuery and ParallelEnumerable – all in System.Core.dll in the System.Linq namespace. But how does the new implementation take advantage (by default when it is worth it) of all the cores on your machine? Remember our friendly task-based programming model? The implementation of the methods of the static ParallelEnumerable class uses Tasks ;-). Given that the implementation is subject to change and more importantly given that we have not shipped .NET 4 yet, I will not go into exactly how it uses the Tasks, but I leave that to your imagination (or to your decompiler-assisted exploration ;)).

Simple Demo Example
Imagine a .NET 4 Console project with a single file and 3 methods, 2 of which are:
  static void Main()
{
Stopwatch sw = Stopwatch.StartNew();
DoIt();
Console.WriteLine("Elapsed = " + sw.ElapsedMilliseconds.ToString());
Console.ReadLine();
}
static bool IsPrime(int p)
{
int upperBound = (int)Math.Sqrt(p);
for (int i = 2; i <= upperBound; i++)
{
if (p % i == 0) return false;
}
return true;
}
…without worrying too much about the implementation details of IsPrime (I stole this method from the walkthrough you get in the VS2010 CTP). So the only question is where is the 3rd method, which clearly must be named Doit. Here you go:
  static void DoIt()
{
IEnumerable arr = Enumerable.Range(2, 4000000);
var q =
from n in arr
where IsPrime(n)
select n.ToString();
List list = q.ToList();
Console.WriteLine(list.Count.ToString());
}
Now if you run this you will notice that on your multi-core machine only 1 core gets used (e.g. 25% CPU utilization on my quad core). You'll also notice in the console the number of milliseconds it took to execute. How can you make this execute much faster (~4 times faster on my machine) by utilizing 100% of your total CPU power? Simply change one line of code in the Doit method:
from n in arr.AsParallel()
How cool is that?

Can It Do More
What the PLINQ implementation does is it partitions your source container into multiple chunks in order to operate on them in parallel. You can configure things such as the degree of parallelism, control ordering, specify buffering options, whether to run parts of the query sequentially etc. To experiment with all that, just explore the other new extension methods (e.g. AsOrdered, AsUnordered) and, finally, the new enumerations (e.g. ParallelQueryMergeOptions). I leave that experimentation to you dear reader ;)

Parallelising Loops in .NET 4

Wed, January 7, 2009, 05:58 AM under ParallelComputing
Often the source of performance issues in our code is loops, e.g. while, for, foreach. With .NET 4 it becomes easy to make such code perform better by taking advantage of multiple cores.

Parallel.ForEach
For example, given:
IEnumerable<string> arr = ...
foreach (string item in arr){
// Do something
}
, we can parallelise it is as follows:
Parallel.ForEach<string>(arr, delegate (string item){
// Do something
});
, or the tidier directly equivalent version (dropping the superfluous generic which can be inferred and turning the anonymous method syntax into a lambda statement)
Parallel.ForEach (arr, (string item) =>{
// Do something
});

Visual Distinctions
Notice the obvious visual similarities that make it almost automatic to parallelise a loop: the only difference in the parallel version is the modification in the first line (rearranging the "arr" and "string item", which are the real pieces of information) and the fact that after the closing brace at the end there is a closing parenthesis and semicolon. The crucial visual observation here is that the body of the loop remains intact.

Why Does It Work
Let's drill into why the modified code compiles and why it is equivalent in intent (even if it is obvious to some). We turned a block of code into a library method call. The .NET 4 (mscorlib) library offers the static class Parallel that (among others) offer the ForEach method. One of its overloads (its simplest) accepts 2 parameters: a source IEnumerable of TSource and a body of code (in the form of the Action of TSource delegate, of course) that accepts a single parameter which is also of TSource, of course. The method will take the body and call it once for each element in the source. If you reread the last 2 sentences you'll find that is exactly what the original loop construct does as well. The real difference here is that the original runs serially (using only a single core) while the modified runs in parallel (using, by default, all cores).

How Does It Work
Those of you that don't like black magic boxes will ask: what does that method actually do inside in order to run things in parallel? My answer: what do you think it needs to do? Remember our friendly task-based programming model? The implementation of the methods of the static Parallel class uses Tasks (and specifically SelfReplicating tasks). Given that the implementation is subject to change and more importantly given that we have not shipped .NET 4 yet, I will not go into exactly how it uses the Tasks, but I leave that to your imagination (or to your decompiler-assisted exploration ;)).

Trivial Demo Example
In a .NET 4 Console project paste the following in the Program.cs file:
  static string[] arr = Directory.GetFiles(@"C:\Users\Public\Pictures\Sample Pictures", "*.jpg");
static void SimulateProcessing() {
Thread.SpinWait(100000000);
}
static string TID {
get {
return " TID = " + Thread.CurrentThread. ManagedThreadId.ToString();
}
}
Now in the empty Main function paste the following:
    foreach (string ip in arr) {
Program.SimulateProcessing();
Console.WriteLine(ip + TID);
}
Console.ReadLine();
Run it and notice how long it takes as well as that only one thread gets used of course and in Task Manager notice the CPU usage. Now change the loop construct so they are as follows:
Parallel.ForEach(arr, (string ip) => {
Program.SimulateProcessing();
Console.WriteLine(ip + TID);
});
Re-run it and notice how much faster it runs and how the number of threads equals the number of cores on your machine and in Task Manager the CPU usage being at 100%.

Why Not Do It Automatically
Many that see this technology ask "Why not automatically change all loops to run parallelised?". The answer is that you cannot blindly apply a Parallel.ForEach wherever you have a foreach loop. If the body of the loop depends on some shared state, or if each loop iteration is not independent of every other iteration, then race conditions may arise by blindly parallelising. Ultimately, it is multiple threads that execute the body in parallel so there is no room for shared state etc. The static methods of the Parallel class have no magic to deal with that – it is still down to you. If you find yourself needing synchronization in the loop body, be sure to measure the performance because locks and such in a parallelisation scenario potentially negate (or severely limit) the benefits of parallelisation. It is for these reasons that parallelising a loop is an opt-in decision today that only you can make for your code.

A related question arises of why not embedding this functionality in the language (the obvious suggestion being introducing a pfor loop construct). The answer is that having it as a library offering instead of built-in to the language allows it to be used by *all* .NET languages instead of restricting it to a few. Also, once something is embedded into the language it typically stays there forever so we take great care about such decisions e.g. it is too early to tie C# or VB to the System.Threading.Tasks namespace.

For the distant imaginary future, we are thinking about automatically parallelising bits of code if we can (with hints from the application developer with regards to purity and side-effect-free regions of code) and also embedding parallel constructs deeper into the language. Too early to know if anything will come of that...

Can It Do More
Yes! We only saw above one of the overloads of one of the methods. Parallel.ForEach has ~20 other overloads, some of them taking up to 5 arguments and all of them having a return type too; what I am trying to say is that there is much more flexibility and richness even in this simple API. I encourage you to explore the other overloads and also the other two methods on the Parallel class: For and Invoke.

Introducing the new Task type

Tue, December 30, 2008, 06:46 AM under ParallelComputing
In a previous post I made the point about the need to finely partition our compute bound operations and enumerated the benefits of fine grained parallelism. In another post I showed how it is a mistake to directly use Threads to achieve fine grained parallelism. The problem was that the unit of partitioning in our user mode app was also the unit of scheduling of the OS.

System.Threading.Tasks.Task
We are introducing in mscorlib of .NET 4 the System.Threading.Tasks.Task type that represents a lightweight unit of work. The code from my previous post would look like this with Tasks (and it does not suffer from any of the 3 problems that the original code suffers from):
static void WalkTree(Tree tree) 
{
if (tree == null) return;
Task left = new Task((o) => WalkTree(tree.Left));
left.Start();
Task righ = new Task((o) => WalkTree(tree.Righ));
righ.Start();
left.Wait();
righ.Wait();
ProcessItem(tree.Data);
}
Tasks run on the new improved CLR 4 ThreadPool engine – I will not repeat here in this post the performance and load balancing benefits, but will instead focus on the rich API itself.

Creation and Scheduling
An example of the API is what we saw above where we used the Task with the same pattern that we use threads (create and then later start). You can see another example of the creation API if we modify the original Main method to look like this:
static void Main() 
{
Tree tr = Tree.CreateSomeTree(9, 1);
Stopwatch sw = Stopwatch.StartNew();
Task t =Task.StartNew(delegate { WalkTree(tr); });
t.Wait();
Console.WriteLine("Elapsed= " + sw.ElapsedMilliseconds.ToString());
Console.ReadLine();
}
Notice how we can create Tasks and start them with a single statement (StartNew), which is similar to how we use the ThreadPool.QueueUserWorkItem with the added benefit of having the reference to the work in the form of the variable 't'.

Waiting
Also notice above how we preserve the semantics of the code prior to the change by waiting for the work to complete before the Console.WriteLine statement. We saw this method further above in the method WalkTree. In fact in WalkTree, we can change the two calls (left.Wait and righ.Wait) with the more flexible Task.WaitAll(left, right) and there are other options such as a WaitAny method that would block only until any one of the tasks you pass into it complete.

Continuations
We can further change the body of the Main method as follows:
Tree tr = Tree.CreateSomeTree(9, 1);   
Stopwatch sw = Stopwatch.StartNew();
Task t = Task.StartNew(delegate{ WalkTree(tr);});
t.ContinueWith(tt => Console.WriteLine("Done"), TaskContinuationKind.OnAny);
t.Wait(2500);
Console.WriteLine("Elapsed= " + sw.ElapsedMilliseconds.ToString());
Notice how we are waiting with a timeout this time which means that after 2.5 seconds we will see on the console "Elapsed..." (given that our WalkTree work takes longer than that to complete). However, at that point the CPU usage will remain at 100% as our work is still being executed. When it completes, as the CPU usage drops down again, we will also see in the console "Done". This should verify your expectation of the self explanatory ContinueWith method. It is a very powerful method (more here) that enables patterns such as pipelining. You can have many continuations off the same task and you can configure the circumstances under which to continue via the TaskContinuationKind that I encourage you to explore along with the various overloads.

Cancellation
Cancellation is well integrated in the API. Cancelling a task that is scheduled in some queue and has not executed yet means that it will not be executed at all. For a task that is already running, cooperation is needed which means that the task can check a boolean property (IsCancellationRequested) to see if cancellation was requested and act accordingly. Finally, you can see if a task is actually cancelled via another boolean property (IsCanceled) on the Task type. If we modify the 2 lines of code above as follows:
    t.ContinueWith(tt => Console.WriteLine("done"));
t.Wait(2500);
t.Cancel();
...we will see the "Elapsed" message followed immediately by a drop in CPU utilization and the "Done" message.
Note that for the cancelation above to behave as expected, we are assuming that when we cancel a Task, all tasks created in that scope also get cancelled, i.e. when we cancel 't' all the tasks created in WalkTree also get cancelled. This is not the default, but we can easily configure it as such by changing the ctor call in WalkTree for both left and right to be as follows:
...= new Task((o) => WalkTree(tree.Left), TaskCreationOptions.RespectParentCancellation);

Parent Child Relationships
The above correctly implies that there is a parent child relationship between tasks that are created in the scope of an executing task. It is worth noting that parent tasks implicitly wait for their children to complete which is why the waiting worked as expected further above. If we wanted to opt out of that we can create detached children via the TaskCreationOptions.Detached option. I encourage you to experiment with the other TaskCreationOptions...

Task with Result
Let's go way back and peek at the original serial implementation of WalkTree and let's modify it so it actually returns a result:
static int WalkTree(Tree tree) 
{
if (tree == null) return 0;
int left = WalkTree(tree.Left);
int righ = WalkTree(tree.Righ);
return ProcessItem(tree.Data) + left + righ;
}
...as we ponder the question of "How do we parallelize that?" take look again at the code we have at the top of this post that parallelized the version that did not return results.
We can change it to return 0 when there are no more leaf nodes and change it to return the results of ProcessItem, but we have an issue with how to obtain the results of the WalkTree(righ) and WalkTree(left) and add them to our return results. In other words: we are passing a delegate to the Task ctor that returns a result and we need a way to store it somewhere. The obvious place to store it is the Task itself! However, we want this strongly typed so we use generics and we have type that inherits from Task which is Task<T> (in the CTP bits it is called a Future<T>). This new type has a property for returning the Value and the call will block if the task is still executing or it will return immediately if it has executed and the value is already stored. So the code can be modified as follows:
static int WalkTree(Tree tree) 
{
if (tree == null) return 0;
Task<int> left = new Task<int>((o) => WalkTree(tree.Left), TaskCreationOptions.RespectParentCanellation);
left.Start();
Task<int> righ = new Task<int> ((o) => WalkTree(tree.Righ) , TaskCreationOptions.RespectParentCanellation);
righ.Start();
return ProcessItem(tree.Data) + left.Value + righ.Value;
}
Note that if we did not want to block on Value then we could have queried the IsCompleted property of the Task.

In Summary
Above I have given you a brief glimpse of the rich API that Task exposes (and there is a lot more such as a nice exception handling model that aggregates exceptions thrown in parallel into a single AggregateException). Combined with my other posts referenced above, you should feel comfortable (if not compelled) to use this new Task API in all parallelism scenarios where previously you considered using directly Threads or the ThreadPool. Furthermore, the rich API has hopefully enticed you to use it even if you had not considered the ThreadPool or threads before.

New and Improved CLR 4 Thread Pool Engine

Mon, November 24, 2008, 12:26 AM under ParallelComputing
A way to think of the CLR thread pool and how it gets used, e.g. when you call ThreadPool.QueueUserWorkItem, is to picture a global queue where work items (essentially delegates) get queued on a global queue and multiple threads pick them out in a First In First Out order. The FIFO order is not something that is documented or guaranteed, but my personal guess is that too many applications rely on it, so I don’t see it changing any time soon.

The image on the left shows the main program thread as it is creating a work item; the second image shows the global thread pool queue after code has queued 3 work items; the third image shows 2 threads from the thread pool that have grabbed 2 work items and executing them. If in the context of those work items (i.e. from the executing code in the delegates) more work items get created for the CLR thread pool they end up on the global queue (see image on the right) and life goes on.

CLR Thread Pool v4 from a System.Threading.Tasks perspective
In CLR 4, the thread pool engine has had some improvements made to it (it has been having positive tweaks in every release of the CLR) and part of these improvements are some performance gains that are achievable when using the new System.Threading.Tasks.Task type. I'll show a code example in another post, but you can think of creating and starting a Task (passing it a delegate) as the equivalent of calling QueueUserWorkItem on the ThreadPool. A way to visualize the CLR thread pool when used via the Task-based API is that, in addition to the single global queue, each thread in the thread pool has its own local queue:

Just as with normal thread pool usage, the main program thread may create Tasks that will get queued on the global queue (e.g. Task1 and Task2) and threads will grab those Tasks typically in a FIFO manner. Where things diverge is that any new Tasks (e.g. Task3) created in the context of the executing Task (e.g. Task2) end up on a local queue for that thread pool thread.

Why Local Queues
With the era of manycore machines upon us and devs taking advantage of parallelism, the number of threads in the thread pool is likely to increase: at a minimum equal to the number of cores for compute bound operations, and likely more due to injection of additional threads as a result of IO bound operations or blocking calls stalling the CPU. Bottom line: more cores = more threads.

With more threads competing for work items, it is not optimal to put up with the contention issues of a single queue that all of them are trying to access safely. This would be amplified by the goal of fine grained parallelism where each work item finishes fairly quickly, so the trips to the global queue would be frequent.

It is for this reason we introduce a local queue per thread, where additional tasks get queued (with no contention) and will then be retrieved by that same thread (again with no contention).

LIFO
So, picking up from the picture further up, let's assume that Task2 additionally creates two more Tasks e.g. Task4 and Task5.

The tasks end up on the local queue as expected, but which Task does the thread pick to execute when it completes its current task (i.e. Task2)? The initially surprising answer is that it could be Task5, which is the last one that was queued – in other words a LIFO algorithm can be used for the local queues.

The reason that this is a good thing is locality. In most scenarios the data required by the last created Task in the queue is still hot in the cache, so it makes sense to pull that down and execute it. Obviously, this means there are no promises on ordering, but some level of fairness is relinquished in the sake of better performance.

Work Stealing
If the only enhancements were the introduction of LIFO local queues then performance is greatly increased, but you should be concerned. You should be concerned about what happens when another thread in the thread pool (likely executing on another core) finishes its work. Luckily, you don't have to be:

The other worker thread completes Task1 and then goes to its local queue and finds it empty; it then goes to the global queue and finds it empty. We don't want it sitting there idle so a beautiful thing happens: work stealing. The thread goes to a local queue of another thread and "steals" a Task and executes it! That way we keep all our cores busy and this contributes to our fine grained parallelism load balancing goal. In the image above notice that "stealing" happens in a FIFO manner, which again for locality reasons is good (its data would be cold in the cache). Furthermore, in many divide and conquer scenarios, tasks generated earlier on are likely to generate more work (e.g. Task6) themselves, which would end up now on this other thread's queue and hence reduce frequent stealing.
Nitpicking note: further up, I mentioned "no contention"; clearly work stealing is the exception to that rule.

What's Next
In addition to the links sprinkled above, you can find a simple implementation of a work stealing threadpool on Joe's blog post and some of the concepts above are touched on in this MSDN mag article by Eric and Erika. If you want to see the pictures above in a fully animated slide, get my PDC deck (slide 8) from this page. Do note that the implementation I am talking about above did not ship with the September CTP of Visual Studio 2010, but is slated for the next drop. Also note that all internal implementation details are subject to change and just shared here for the geek factor ;-)

So you can see how using the Task-based API will yield cool perf gains under the covers. An additional reason to use the new Task-based API is because of its richness. I'll touch on that in a next blog post.

Debugging Parallel Applications with VS2010

Wed, November 19, 2008, 03:48 PM under ParallelComputing
I have mentioned previously on this blog the two new debugger toolwindows our team is adding to Visual Studio 2010: Parallel Tasks and Parallel Stacks. I will be blogging a lot more about these, so for now I encourage you to get a high level understanding by watching my 10-minute screencast. All feedback welcome.

Do NOT Explicitly Use Threads for Parallel Programming

Mon, November 10, 2008, 11:20 PM under ParallelComputing
I presume you are sold on the goal of achieving fine grained parallelism – if not please read that post.

In that post I talked quite a bit about the need to partition our work into many small chunks. So how could we partition a long running work item that looks like this:
  static void Main()
{
Tree tr = Tree.CreateSomeTree(9, 1);
Stopwatch sw = Stopwatch.StartNew();
WalkTree(tr);
Console.WriteLine("Elapsed= " + sw.ElapsedMilliseconds.ToString());
Console.ReadLine();
}
static int ProcessItem(int treeData)
{
// for demo purposes
Thread.SpinWait(4000000); //TODO something real with data
return treeData; // not being used
}
static void WalkTree(Tree tree)
{
if (tree == null) return;
WalkTree(tree.Left);
WalkTree(tree.Righ);
ProcessItem(tree.Data);
}
…assuming that Tree is defined like this: Tree.cs.

The immediate thought might be to use a thread, for example:
  static void WalkTree(Tree tree)
{
if (tree == null) return;
Thread left = new Thread((o) => WalkTree(tree.Left));
left.Start();
Thread righ = new Thread((o) => WalkTree(tree.Righ));
righ.Start();
left.Join();
righ.Join();
ProcessItem(tree.Data);
}
So now the code runs faster (e.g. on a quad core machine) than the sequential approach – the result is good. But the way we achieved this was not good, for at least 3 reasons:

1. By oversubscribing the CPU like this (creating 1023 threads on a quad core machine) we are paying a hefty price for context switching. Sure, the overall performance increased, but it could have increased even more if we used the correct number of threads. The correct number of threads is, of course, equal to the number of cores on the box. For example on a quad core, 4 threads is the ideal number of threads to execute compute bound work.

2. By making the OS schedule all those threads for our process, our process is getting an unfair advantage over other apps on the same box. That is being a bad citizen on the machine.

3. The most important reason IMO that the approach above is a bad idea is memory consumption. Since CLR 2.0, every managed thread uses 1MB of committed memory. Depending on your machine configuration and environment setup, the code above won't even run and will instead throw an OutOfMemoryException exception. That is a clue that this approach simply does not scale. We need an approach where we increase our data load (e.g. the depth of the tree) and have our algorithm scale. This again goes back to point 1, which is that ideally the number of threads used by our process is equal to the number of cores on the machine.

So even though partitioning the problem into many small chunks was a good thing, using threads was not. The fundamental problem here is that the unit of partitioning in our user mode app is also the unit of scheduling of the OS.

So, we need some kind of user mode "engine" to schedule only as many threads as the number of cores on the machine and we need this to take place automatically for us. We also need to be able to partition the overall compute-bound operation into many work items that will get executed by the "engine". If this sounds familiar, it should: ThreadPool. The CLR thread pool has the correct internal logic and a simple interface (QueueUserWorkItem) for scheduling work items to be executed by the threads it manages. This appears to be the answer to achieving fine grained parallelism.

The problem with the current ThreadPool API is that it has almost no API. You simply throw items to it in a "fire and forget" manner. You get back no handle to the work item. No way of cancelling it, waiting on it, composing a group of items in a structured way, handling exceptions thrown concurrently or any other richer construct built on top of it. So while you should be using the ThreadPool today for parallelism, there is a considerable improvement coming in .NET 4 – I'll cover that in another blog post. In the meantime, I leave it to you dear reader to convert the tree walking sample above to directly use the ThreadPool instead of threads (hint, you'll need a ManualResetEvent or equivalent to simulate the Thread.Join semantics).

As an aside, there are many people (e.g. Jeffrey Richter) that advise to never explicitly use threads for anything at all (not just in the context of parallelism, but under no circumstances whatsoever). Their advice is to always use the ThreadPool wherever you considered using a thread! Can you argue with that?

Parallel Programming and the Virtual PC limitation

Fri, November 7, 2008, 11:24 PM under ParallelComputing
The question of "How do I try/show the parallel bits in VS2010 outside of the VPC?" or variants of that keeps appearing in my inbox. That is because of Virtual PC's limitation to only run one core, which kind of sucks for parallel programming.

Here is the story:
1. The VS2010/.NET 4.0 CTP is only available as a VPC. Sorry, no directly installable bits that I can share. You can still use the VPC to get a feel for the APIs and tools, though.
2. Parallel Extensions are now part of mscorlib.dll with dependencies on the CLR 4.0, so no you cannot copy bits from the VPC and use it with VS2008.
3. You can however, run the virtual image on HyperV and then you have access to all the cores on your box. Instructions for that are here (thanks Grant for incorporating my comment into the blog post).
4. If that is not an option for you either, then your last resort is to use the old Parallel Extensions June CTP that works with VS2008. Of course, via that route, you cannot play with the new debugger bits.

In any case, have fun!

Fine Grained Parallelism

Thu, November 6, 2008, 10:32 PM under ParallelComputing
When trying to take advantage of multi-core machines, the first step is to identify the areas in your code that can literally run at the same time. Unless you are really lucky, what this step really means is you will have to partition your compute bound work into smaller chunks that can run in parallel.

For example, if you are walking a binary tree data structure (typically in a recursive manner) and there is some compute intensive operation carried out on each node, maybe you can partition the work in such a way so the left side of the tree gets processed at the same time as the right side of the tree gets processed. You have partitioned your work into 2. So, on a dual core machine, you should see a performance gain. What performance gain would you further see on a quad core or 24-way machine? None beyond what you saw on the dual core.

Our goal with parallel programming is to write once and have our code scale well as the hardware underneath it gets better, i.e. see incremental benefits when running our app on machines with more cores without changing the code. For this to be achieved, we need to partition our work into multiple chunks in such a way so that ideally: # chunks >= # cores of the highest end machine we expect our app to run on.

The impact of the message in the previous paragraph is that, if we revisit the tree example, maybe we should process each node at the same time. So, if the tree has 500 nodes, our code would scale well up to a 500 core machine. An additional reason this would be a good thing is that if, as is typical, our problem size increases over time (i.e. the number of nodes in our example) our algorithm would also scale to take advantage of even more cores.

There is yet another reason that we need fine grained partitioning. Let's say that we partition our work into 8 work items and we know that the code will always execute on an 8-way machine, so we feel good about our approach. What if those 8 work items do not take the same time to complete? Let's say that 1 of them completes fairly quickly and the remainder take longer. Now we have a core sitting idle instead of helping with the overall work. Had we partitioned the work into much smaller chunks, when a core is finished with the item it executes, it would be able to start working on another chunk hence achieving the desired load balancing.

Hopefully you agree that fine grained parallelism is one of the ways forward in the manycore era. Next I'll show an example using code that shows how we partition the work and then schedule it on the cores.

Threading/Concurrency vs Parallelism

Mon, November 3, 2008, 02:24 AM under ParallelComputing
To take advantage of multiple cores from our software, ultimately threads have to be used. Because of this fact, some developers fall in the trap of equating multithreading to parallelism. That is not accurate.

You can have multithreading on a single core machine, but you can only have parallelism on a multi core machine (or multi proc, but I treat them the same). The quick test: If on a single core machine you are using threads and it makes perfect sense for your scenario, then you are not "doing parallelism", you are just doing multithreading. If that same code runs on a multi core machine, any overall speedups that you may observe are accidental – you did not "think parallelism".

The mainstream devs that I know claim they are comfortable with multithreading and when you drill into "what scenarios they are enabling when using threads" there are 2 patterns that emerge. The first has to do with keeping the UI responsive (and the UI thread affinity issue): spin a thread to carry out some work and then marshal the results back to the UI (and in advanced scenarios, communicate progress events and also offer cancellation). The second has to do with I/O of one form or another: call a web service on one thread and while waiting for the results, do some other work on another; or carry out some file operation asynchronously and continue doing work on the initiating thread. When the results from the (disc/network/etc) IO operation are available, some synchronization takes place to merge the data from the executor to the requestor. The .NET framework has very good support for all of the above, for example with things like the BackgroundWorker and the APM pattern (BeginXYZ/EndXYZ) or even the event-based asynchronous pattern. Ultimately, it all comes down to using the ThreadPool directly or indirectly.

The previous paragraph summarized the opportunities (and touched on the challenges) of leveraging concurrency on a single core machine (like most of us do today). The end user goal is to improve the perceived performance or to perhaps improve the overall performance by hiding latency. All of the above is applicable on multi-core machines too, but it is not parallelism. On a multi-core machine there is an additional opportunity to improve the actual performance of your compute bound operations, by bringing parallel programming into the picture. (More on this in another post).

Another way of putting it is that on a single core you can use threads and you can have concurrency, but to achieve parallelism on a multi-core box you have to identify in your code the exploitable concurrency: the portions of your code that can truly run at the same time.

Video on Parallel Developer Tools

Fri, October 17, 2008, 06:24 PM under ParallelComputing
Last week SeanNo, SteveTei and I spent 40 minutes with Charles from channel9 discussing and showing what we are working on in PDT for Visual Studio 2010 for enhancing the debugging and profiling experience for parallel programming.

Watch the ch9 video here.

Parallel Extensions are part of the .NET Framework 4.0

Sat, October 11, 2008, 01:59 PM under ParallelComputing
There have been two CTPs for the "Parallel Extensions to the .NET Framework 3.5" (readers of this blog will remember November and June).

Aligned with the recent announcement about .NET 4.0 coming, the pfxteam announced yesterday that Parallel Extensions gets rolled into .NET Framework 4.0.

This is great news because it means that there should be no concerns from a deployment, support and future versioning perspective: it is the same as the .NET Framework :-)

IMO it is a misnomer now to refer to these bits as Parallel Extensions since they are now part of the core: mscorlib.dll and system.core.dll. It is however still relevant to use the terms TPL and PLINQ, the two major components and that is what I did for the abstract of my PDC session.

Parallel Tasks window

Wed, October 1, 2008, 02:31 PM under ParallelComputing
Previously I asked about properties of Tasks that you'd like to see when debugging and suggested some:
[...]which ones are not scheduled yet [...], which ones are Running and which ones have run a bit and now are Waiting [...]. [...]quickly see the call stack of each Task and also which thread it is executing on. [...]parent-child relationship between Tasks.
Rather than talk about it in totally abstract terms, how about having a few mock up pictures.

After hitting a breakpoint, below are 2 Tasks running and 4 that are waiting (in our example there aren't any Tasks that are scheduled in a queue and not run yet). Then on the picture on the right, we switch to parent child view, we can see that four Tasks are actually waiting for their child tasks to complete:


In this different example below, we grouped by the Location column so we can see that 3 Tasks are running in method H of class P, and 1 task has at the top of its stack the method C of the same class. We also see the IDs of the underlying threads running those Tasks:


I can't wait for you to start working with the Task-based APIs, so you can provide feedback on what supporting tools you'd like to see. Hopefully the Parallel Tasks debugger toolwindow is a good start.

Parallel Stacks for multi-threaded debugging

Sat, September 27, 2008, 02:57 PM under ParallelComputing
My previous post (on active stack frame and current thread) ended by raising an issue, a solution to which I propose below.

Consider the following screenshot of code (inc. snippet from Threads window) that has hit a breakpoint and envisage the call stacks for each thread before reading the rest of this blog post:


As a developer debugging a multi-threaded app, you need the ability to view call stacks of multiple threads at the same time – not just a single one at a time. What would you wish this to look like? The obvious solution would be a window like this:


If we can get to the stage above, why not aim for a few more goals: Draw it as a call graph (method calls go from top to down) and, more importantly, visually indicate when threads share common method call paths. Here is a picture (identical info to previous picture) delivering on those goals:


The “xN” indicates that the call stack segment box is shared by N threads. To piece together the entire call stack for a thread, we mentally concatenate the boxes vertically. So the diagram above reads as follows:
"One thread started in Main. It then called A; A was called by 3 threads in total, so we can deduce that 2 other threads have started their life in A. Of the 3 threads, 2 called B (and that is where their active stack frame is right now). The remaining one thread from A called C and subsequently an AnonymousMethod from C and that is where its active stack frame is now (this is also the current thread)."

What do you think? How can you make this better or what alternative do you propose?

Answer to Tasks quiz: you just can't tell

Mon, September 8, 2008, 12:34 PM under ParallelComputing
In a quiz I posted recently, I had some replies in the comments (which are incorrect btw) and more replies over emails that were correct (with a caveat). I am referring to question A (and I touched on the motivation for question B here).

In short, the correct answer to (trick) question A is that the only thing guaranteed is breakpoint #5 will be hit last and BP #1 happens before #2 and #3. There is a race between BP #4 and #1 and then a similar race between BP #2 and #3, which means that we cannot tell the overall order.

Now, I mentioned above that there was a caveat: In majority of replies they stressed that even though we cannot tell for sure, it is likely/probable that BP #4 would be hit before #1 due to overhead of setting up the child Task. Indeed if you run that exact code on your dual core machine, you’ll likely/probably find that that is the case. However, this is certainly not guaranteed or expected.

Take the original code: what 2 statements can we insert at the start of Main (before creating Task t1) that will result in BP #1 being hit before BP #4? Here is one answer:
Thread.CurrentThread.Priority = ThreadPriority.Lowest;
TaskManager tm = new TaskManager(new TaskManagerPolicy(1, 1));
...and of course passing tm as the last argument to the Create methods. Try it!

If you think that changing the thread priority was too artificial/contrived, consider that if it is a kernel event that wakes up the scheduler thread it could result in a priority boost, which has a similar risk of causing pre-emption.

If there is one guarantee about what threads run when, it is that there is no guarantee - and any internal engine (CLR, Windows) has the right to change their implementation details anyway so don't rely on empirical findings.

What are the interesting properties of Tasks at runtime?

Sun, September 7, 2008, 10:44 PM under ParallelComputing
The second question (B) of the quiz I posted here was meant to make you think about the complications of adding a Task reference to the Watch window. I then went on to show how to use Tack.Current and make object id as a technique to help a bit. I continued by taking advantage of the DebuggerDisplayAttribute which essentially results in a productivity boost. The real question though is why during debugging would I want to watch a Task to start with?

Well, my hope is that the Task object would get more public properties that I can use to determine things like e.g. its status. But the real need is to be able to create a holistic view of my system in terms of *all* the Tasks that my code creates explicitly or implicitly. That need is what I’ve been trying to approximate with the Watch window, but so far it has ended up being a very poor solution.

So, my wish as a developer embracing the Task-based programming, is to have some way (e.g. a new VS debugger toolwindow?) of viewing all the Tasks in my system and being able to quickly determine which ones are not scheduled yet (let’s call them Initialized), which ones are Running and which ones have run a bit and now are Waiting on some resource before they can continue. If we imagine that we have this view, then I get greedy and I also want to be able to quickly see the call stack of each Task and also which thread it is executing on. My greed continues to the extent of wanting to easily view the parent-child relationship between Tasks. Have I missed any requirement? What information would you want to see in a dedicated Tasks window?

Quick Quiz on Tasks

Fri, August 22, 2008, 07:26 PM under ParallelComputing
Steps:
1. New C# Console Project in VS2008
2. Add Reference to System.Threading.dll (from Parallel Extensions June CTP)
3. Replace the entire contents of Program.cs with the following (overly simplified extract of a more complex piece of code):
using System;
using System.Threading.Tasks;

static class Program
{
static void Main()
{
Task t1 = Task.Create(delegate
{
Task t2 = Task.Create( // breakpoint #1
(o) =>
Console.WriteLine(o.ToString()) // breakpoint #2
, "hey");
t2.Wait(); // breakpoint #3
});
t1.Wait(); // breakpoint #4

Console.ReadLine(); // breakpoint #5
}
}

4. Insert a breakpoint (F9) wherever there is a comment.

Questions:
A. Without running the project, what can you predict about which breakpoints will be hit and in what order?
B. Can you predict at each breakpoint, which of the two variables (t1, t2) is in scope (e.g. if they were in the Watch window)?

Moore's Law in relation to manycore

Mon, July 28, 2008, 01:40 AM under ParallelComputing
When most people's brains first light up on why parallelism is the next BigThing, some jump to the conclusion that Moore's law is over. Let's clear that up below.

All of you know Gordon Moore's law which boils down to the prediction of
"the number of transistors on a chip will double about every two years"
In the last 30-40 years the previous prediction has manifested itself in clock speed increases and that is what has tricked most of us to associate Moore's law with CPU speed.

So, now that chip manufacturers cannot make single CPUs any faster (well, they can, but they can't cool them down enough to make them useful), they are resorting to having chips with multiple cores, which we are terming the manycore shift. The manycore shift has a profound impact on developers (especially those programming for the desktop client) in that their software now has to learn how to take advantage of parallelism.

So if you followed the logical flow so far, you'll conclude that Moore's law is still alive: we are still getting more silicon, but it does not translate to increased linear speed, but rather to parallel "engines" that your software must learn to utilise.

I am glad we cleared that up :)

Name Your Threads

Tue, July 22, 2008, 02:15 AM under ParallelComputing
One of my pet peeves is ensuring that whenever there is code that explicitly creates a thread, to always have an accompanying statement that names the thread. This is invaluable in debugging. With managed code, it is so simple, just one extra statement to set the thread's Name property (which you can only do once at runtime, of course).

This is such a useful thing to have when debugging, that in VS2008 the ability was added to name threads after execution had started. The idea there is for naming Threads that you don't control but still need to easily identify for debugging purposes. The name does not persist cross debugging sessions and indeed it is not used at runtime by anything other than your... eyes. I describe this feature as part of my video on all the new VS2008 threading enhancements (watch minutes 06:00 through 08:20, although I recommend the full 15 minutes).

At the OS level the ability to have names against threads is not supported (but you can use nice HEX ids to assist with your debugging ;)). Recently I discovered that there is an old trick (or hack IMO) that you can use with certain tools (inc. Visual Studio) to set names on native threads too. To get the details visit this short How To on MSDN. I did a quick search and discovered two more places on the web where this is described. One is on codeproject which is blatantly lifted from MSDN but it adds a couple of screenshots. The other also points to (an obsolete place on) MSDN and adds a bit more detail.

In short, for my managed friends: Search your code base now for the string "= new Thread" and for every match that you find, verify that you are also setting the Name property. You'll thank me later.

Quotes about concurrency by AndersH

Sat, July 12, 2008, 08:14 PM under ParallelComputing
Yesterday a new 1-hour video interview on C# 4.0 was posted on channel9.

At some point the question is posed to Anders:
"What are some of the big issues that you are thinking about for the future?"
and Anders' reply (ffw to 39:56) identifies concurrency as the #1 thing:
"Concurrency is by far... profoundly changing... Moore's law... we've been ignoring concurrency because we could... now we can't... it is a damn hard problem..."
My favorite quote comes at 45:13 and includes hand gestures too:
"It is foolish to think that somehow we are going to be able to pepper concurrency on your code and you wouldn't need to modify anything in your apps today for them to run concurrently"
For the stuff in-between and to get the complete picture, watch the video.

Parallel Extensions June CTP is out

Mon, June 2, 2008, 04:13 AM under ParallelComputing | Links
Following the first ever drop last December, the latest preview is now available. Ed has the link and details here.

Parallel Extensions session resources

Fri, May 23, 2008, 04:41 PM under Events | ParallelComputing
- Here are the slides (save as pptx).
- The demos were a subset of these videos: Samples, Task etc, Parallel class, PLINQ.

Thank you to those that attended my Parallel Extensions session earlier today at DevDays. I don't think I have ever seen so much interest in a technology before (I was answering questions for a good 20' after my 70' session ended). This is turning out to be one of my favourite talks – it just gives itself ;-)

My article on the Parallel Extensions

Fri, February 29, 2008, 06:38 AM under dotNET | ParallelComputing
A while back I recorded some screencasts on this hot topic, and I see now that the popular VSJ developer magazine has published my article on Parallel Extensions to the .NET Framework.

For those of you that can't get a hard/physical copy, they have kindly made it available online for your reading pleasure.

Parallel Extensions

Fri, November 30, 2007, 09:17 AM under dotNET | ParallelComputing
The Parallel Extensions to .NET Framework 3.5 is available! Download and play with the first ever public drop - the December CTP.

If you are then ready to dig into it, I have three 20' screencasts (plus more cooking):
1. Tour of the Samples. A tour of what gets installed to get you started.
2. Declarative data parallelism. This is about PLINQ.
3. Imperative data parallelism. This is about the static Parallel class.

After watching the above, visit the relevant MSDN dev centre. For any questions please use the dedicated online forums. For feedback please use the connect site. If you want to congratulate or blame the product team, visit their blog.

The manycore shift white paper

Thu, November 29, 2007, 01:17 AM under ParallelComputing | Links
"Parallel Computing Initiative Ushers Computing into the Next Era"
A bit high level (marketing?) at times in this 10-page document, but there is definitely some interesting stuff in there - read it!

Futures, promises and dataflow programming

Wed, November 28, 2007, 04:25 PM under ParallelComputing | Links
I am a bit slow so I had to read this page twice on wikipedia, but it was worth it in the end, I think. See if you get it all in one pass: Futures and Promises. Because my imperative head wasn't completely blown away I also spent time trying to grok dataflow programming. Opens your mind doesn't it?

Concurrency and Parallelism

Wed, November 28, 2007, 09:50 AM under ParallelComputing | Links
Via Jason, I discovered this post on the concurrency learning curve and following links from there, I found Intel's view on "data and task parallelism". Interesting stuff!

Multithreaded Debugging Enhancements in Visual Studio 2008

Tue, September 25, 2007, 05:51 AM under ParallelComputing | Orcas | VisualStudio
Rather than writing or screenshoting the new multithreaded debugging enhancements in Visual Studio 2008, I thought I'd create a 15' video to demonstrate them. See if you can spot what the bug is before I "discover" it in my demo ;-).

How to go from Thread to ProcessThread

Fri, September 21, 2007, 09:27 AM under dotNET | ParallelComputing
Angelos found an interesting article via the UK MSDN Flash. If you did as well, check out more about that on the author's blog (one more reason to be sorry PDC was cancelled).

Anyway...

In a not so unrelated area, on a list that I am a member of, a question came up about affinitising a managed thread to a specific CPU. Jeffrey Richter came to the rescue by pointing out the System.Diagnostics.ProcessThread and its ProcessorAffinity property but then the harder question came along of how to associate that class with the System.Threading.Thread class. Below is the answer in C# from Mr Richter again:
      // Call this passing in 0
public static ProcessThread GetProcessThreadFromWin32ThreadId(Int32 threadId) {
if (threadId == 0) threadId = ThreadUtility.GetCurrentWin32ThreadId();
foreach (Process process in Process.GetProcesses()) {
foreach (ProcessThread processThread in process.Threads) {
if (processThread.Id == threadId) return processThread;
}
}
throw new InvalidOperationException("No thread matching specified thread Id was found.");
}
...where ThreadUtility is a class containing at least:
      [DllImport("Kernel32", EntryPoint = "GetCurrentThreadId", ExactSpelling = true)]
public static extern Int32 GetCurrentWin32ThreadId();

The code (and much more) is part the Power Threading Library which is available on the Wintellect site.

Parallel LINQ

Mon, July 9, 2007, 09:43 AM under ParallelComputing | LINQ | Links
Having done a lot of real world work with threading in the .NET Framework including working with the numerous limitations of NETCF v1.0 (inc. implementing the BackgroundWorker for it), I read with interest Sam's parallel computing blog post to see what links there would be in there and I wasn't disappointed. Check it out if you are new to threading in the managed world. That reminded me about a related topic that I keep mentioning at the end of my LINQ presentations and that I've been meaning to blog about in response to Tim's question: Parallel LINQ (PLINQ).

One of the numerous benefits of LINQ is the move to declarative programming, which has side benefits over and beyond the obvious ones. By writing code that tells the engine what it is that we want it to do rather than how to go about it, we open new possibilities where the engine can take our intent and split/execute it on multiple threads/cores (since ultimately it is responsible on the how). While most devs "get" that, it may sound a bit woolly to others, so here are some links/info about PLINQ.

I believe the first mention of PLINQ is in this eWeek article (August 2006). Joe Duffy announced his involvement (September 2006) and then followed it up with more info and a slide deck (January 2007). Bart watched a presentation on the topic and spills the beans on the AsParallel extension method which he follows with a NON-Plinq code example (April 2007). Finally, watch a real 5' demo by Luca from Tech Ed [between 51:26-56:40] (May 2007).

Of course, it is early days and PLINQ will not ship with VS2008 (or even as part of the wider Orcas-wave) but you get the idea... The earlier you start taking advantage of LINQ, the earlier you'll be able to take advantage of PLINQ when it eventually ships ;)